Tag Archives: snack

Sisterly Pride and a New Favorite Snack

14 Nov

I have three younger sisters and I’m insanely proud of all of their accomplishments and choices in life. It was a life-altering experience that led my youngest sister Jill to a career in holistic nutrition. And aside from my usual sense of pride, I’m also grateful that as a result, she’s introduced me to a whole new world of delicious and health-conscious food.

After overcoming a very serious case of shingles that put her whole life on hold for almost a year, my sister left a stress-inducing career in fashion to go back to school for holistic nutrition. It wasn’t until she took control of her own health and educated herself that she was able to fully heal.

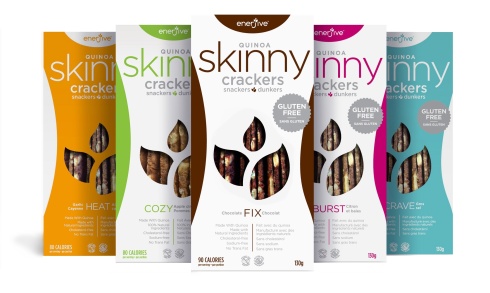
Jill has come a long way and has worked hard to build her new career path. She’s now a practicing holistic nutritionist in Ottawa and will be teaching cooking classes at a clinic called Revivelife. She also works for a great company called Enerjive, which has created a line of healthy snacks: Quinoa Skinny Crackers.

I would never endorse a product I didn’t truly believe in or feel passionate about. But after my sister introduced me to Quinoa Skinnys I fell in love with my new favorite snack. I’ve tried every single flavour, two savory and three sweet, and I’m having a hard time deciding which one is my top pick. It’s a toss up between ‘Heat’ (garlic & cayenne) and ‘Fix’ (chocolate).

The savory flavours really hit the spot when I’m craving something salty and the sweet ones are just sweet enough to curb my afternoon sweet craving without a sugar crash or an overpowering sense of guilt.

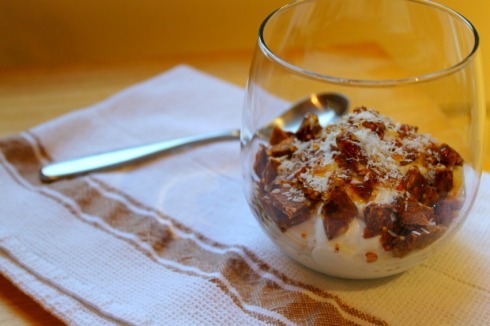
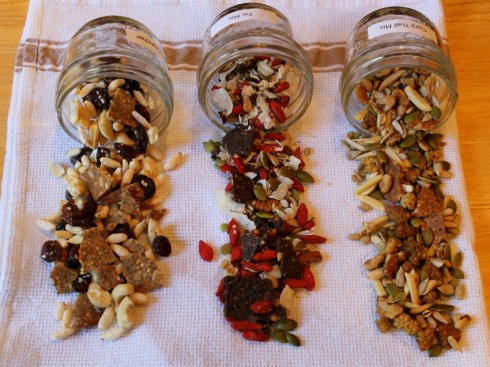
Jill likes to use the rock-salt flavor ‘Crave’ as a crust for baked tilapia. Enerjive has shared some of their own recipes for yummy granola-style mixes below. They sent me samples of each and I liked them so much, I ate them with plain Greek yogurt for breakfast every morning until my stash was gone. And when it was I just crushed up one stick of the apple cinnamon ‘Cozy’ flavor and one stick of the lemon berry ‘Burst’ flavor and tossed the pieces on top of my plain Greek yogurt along with some dried coconut and a drizzle of buckwheat honey (pictured at the top).

Quinoa Skinny Crackers are available at select stores across Canada. Check out Enerjive’s website for store locations and more info.

Giveaway: If you’re dying to try them for yourself, we’ve got one lovely gift basket including all five flavors for one lucky reader (within Ontario only). All you have to do is leave us a comment below telling us about your most favorite healthy snack. We’ll choose one random winner and the gift pack is yours.

Thanks to Enerjive for sharing the following recipes for their three granola-style mixes! (I loved them all, but the salty/sweet Crave Cruncher won my heart)

Each recipe makes 2 cups (6 servings)

Cozy Trail

6 Enerjive apple cinnamon Cozy Skinnys, roughly chopped

½ cup dried mulberries

¼ cup each: walnut pieces and slivered almonds

¼ cup each: sunflower seeds and pumpkin seeds

¼ tsp ground cinnamon

In a large bowl, combine ingredients well. Transfer and store in an airtight container in the refrigerator.

SKINNY TIP: Keep mix in the fridge to retain flavours and freshness and prevent nuts and seeds from going rancid.

Crave Cruncher

6 Enerjive rock salt Crave Skinnys, roughly chopped

1/2 cup raw cashews, roughly chopped

1/3 cup brown rice puffs or quinoa puffs

1/3 cup each: dried cranberries and dark chocolate chips or pieces

2 tbsp sesame seeds

In a large bowl, combine ingredients well. Transfer and store in an airtight container in the refrigerator.

SKINNY TIP: Add crave cruncher to your oatmeal or a top a fruit salad for added crunch!

Fix Mix

6 Enerjive chocolate Fix Skinnys, roughly chopped

¼ cup pecans, roughly chopped

¼ cup each: sunflower seed and pumpkin seeds

¼ cup each: unsweetened coconut flakes and dried goji berries

2 tbsp each: cacao nibs and hemp seeds

In a large bowl, combine ingredients well. Transfer and store in an airtight container in the refrigerator.

SKINNY TIP: For added flavour, toast sunflower and pumpkin seeds before adding into the mix.

Food Find: Garlic Scape Powder

24 Feb

Last summer Neil and I were introduced to garlic scapes for the first time ever. We had unexpectedly gotten a bunch through an organic produce delivery service and we experimented with a few different ways of cooking with them.

And just as soon as we had fallen in love with the gorgeously green and deliciously mild stalks, the season was over and they disappeared.

So, you can imagine our delight when right smack in the middle of winter (far from garlic scape season) we stumbled upon organic garlic scape powder from Ontario-based Chef Organics at our favorite spice store in Toronto, The Spice Trader.

We had gone into the store to stock up on some of our favorite cupboard must-haves but as always, owner Allison Johnston offered up some amazing tips on new products and what to do with them. She asked us if we had ever tasted garlic scape powder and our eyes popped. She told us we had to try it, saying it was delicious added into just about anything or even just sprinkled into olive oil and used as a dip for bread.

She was right. Since then, I’ve been sprinkling garlic scape powder into everything from mashed parsnips to soups and salad dressings.

Garlic scapes themselves have a milder flavor than garlic cloves and the powder has a bit of a sweetness to it that’s really wonderful. Chef Organics describes the taste as having a slight hint of onion. It smells amazing, it tastes great and it’s a good way to keep garlic scapes in your cooking repertoire throughout the year.

I decided to whip up a quick garlic scape hummus and I loved how pretty it looked with a bit of powder sprinkled on top.

If you’ve never made hummus at home before, you won’t believe how easy it is. This recipe can be made with regular garlic powder of course, but if you can get your hands on some garlic scape powder, definitely give it a try. You’ll notice such a pleasant difference in the taste.

Garlic Scape Hummus

1 small can chickpeas, drained

1 Tbsp tahini

Juice of 1 lemon

1 Tbsp garlic scape powder (or to taste) plus extra for sprinkling on top

Good quality olive oil

Sea salt

In a food processor, add the chickpeas, tahini, lemon juice, and garlic scape powder. Turn the food processor on and slowly add in olive oil until you get a consistency that you like. The longer you let it go, the smoother and fluffier the hummus will be. Season with sea salt.

I like to serve hummus drizzled with a little bit of olive oil and sprinkled with some garlic scape powder on top.


Easy Homemade Jalapeno & Lime Beef Jerky

3 Feb

Neil and I are very proud of our Moogarita, the cocktail we created using Canadian Beef for Kitchen Play’s February Progressive Menu. We love that it’s gotten people talking about the use of beef and beef stock in different ways.

But in our last post, with the focus on the drink itself, a key component may have been overshadowed: the jalapeno & lime beef jerky.

We created the homemade jerky as a garnish for the Moogarita but quickly realized that this recipe should not be treated as an after-thought. This jerky is worth making and not just to be used as a garnish.

It’s delicious. It’s full of lean protein. It’s packed with a ton of flavor. And it’s an awesome snack.

I never considered making beef jerky at home. I’ve barely ever touched the packaged stuff. It was always a hot item on the craft table of many television sets I’ve worked on and I never understood why. (Hungry crew like meat in any form, I guess!) But the packaged version doesn’t even compare to a homemade one. It’s a different ball game altogether.

To create our recipe for jalapeno & lime beef jerky, we recipe-tested a few times to get the ingredients and technique just right. That meant eating quite a bit of homemade beef jerky and I think I got addicted in the process.

This jerky is packed with such a punch of flavor! You can really taste the jalapeno, not just the spice and heat, but the flavor of the pepper itself. You can even smell it as the jerky is drying in the oven. It kind of taunts you as you patiently wait for it to be done…

The first batch we made used more lime juice and less brown sugar and we found it too be a little too tart. We also cooked the first batch on a higher heat at 200 degrees and realized it probably needed to cook slower on a lower heat.

We had a lot of fun testing and coming up with the final recipe and I really encourage people to try making beef jerky at home whether you use this homemade version or another. Making it yourself ensures you know just what’s going into it. You can control the salt and sugar and feel good about eating a snack that’s preservative-free.

So in an effort to give this little recipe a shot at the limelight (bad pun but I’m going with it), I thought I’d post it again with a little bit more detail on how it came together.

Jalapeno & Lime Beef Jerky

3/4 lb flank steak

1 jalapeno, half of seeds discarded, chopped

1/3 C fresh lime juice

1/2 C tequila

1/4 C tamari soy sauce (or regular soy)

4 Tbs brown sugar

2 tsp salt

2 tsp pepper

Slice beef against the grain, into long, thin strips. The butcher we got the beef from actually gave us this handy tip: put your meat in the freezer about an hour before cutting it. It’ll be easier to slice.

In a large bowl, whisk together lime juice, tequila, tamari soy, brown sugar, salt and pepper until the sugar dissolves. Stir in the jalapeno with the seeds.

Place beef strips in a glass baking dish (or other non-reactive receptacle) and pour marinade overtop.

Cover with plastic wrap and marinate in the fridge for at least 6 hours.

We marinated ours overnight and by morning the beef was very dark and almost looked somewhat cooked.

Preheat oven to 175 C. Remove marinated beef from the fridge, and place slices on paper towel. Remove any jalapeno seeds stuck to the beef if you want a milder beef jerky or keep them in for some nice heat. Using more paper towel, pat the pieces of beef to remove excess liquid.

Line a baking sheet with tin foil. Arrange beef slices flat on sheet without overlapping.

For our Moogarita garnish we wanted the jerky to have a nice polished, stylish look so we twisted each piece as we placed them on the baking sheet. But you can leave them flat for a more traditional look.

Sprinkle with sea salt and place in oven.

Lay the pieces flat or twist for a different look

After 1.5 hours, remove the baking sheet and flip each piece of jerky over. Put back in the oven for another hour.

After another hour, check to see how dry the beef is, flip slices again, and put back in the oven for an additional 15-30 minutes, if needed. The goal is for the jerky to be as firm and dry as possible, without getting too brittle.

When sufficiently dried, remove jerky from oven and let cool. The beef will dry further as it cools so make sure not to overcook/over-dry in the oven.

If you’re lucky enough to have leftovers, you can store them in an air-tight container or sandwich bag in the fridge for a few days.

Vegan Muffins: One Batter, Four Ways

13 Dec

I just may be the only non-vegan writing about vegan-friendly and healthy baked goods during the holiday season. But it’s exactly the right time of year, for me anyway, to be looking for healthy alternatives in the face of so much holiday excess.

I’m not a vegan or even a vegetarian, but I do love alternative recipes, interesting textures and different, healthful ways of looking at food. I tend to go for vegetarian options more often than not, simply because I love the fresh ingredients and flavors that they’re typically made with. Anything gluten-free, vegan or raw will always catch my attention – though not at the expense of giving up a good burger or charcuterie plate.

See? You really can have it all! At least when it comes to food.

I have a little thing for all of the vegan and gluten-free goodies from Sweets from the Earth. Their lavender-chocolate cupcakes and organic medjool date squares are decadent pieces of heaven. One bite of any of their treats will make you forget you’re eating a healthier alternative to traditional baked goods, and I very much appreciate that.

Well, I’m no professional baker but I did find a simple recipe for vegan banana muffins that I could make easily at home, and they’ve become a staple. After reading through a bunch of recipes online, this one really stood out to me because of the minimal ingredients and the fact that there’s absolutely no refined sugar in the batter. These muffins are sweetened with dates and applesauce, and have soymilk in them for a bit of added protein and richness.

I’ve taken the recipe further by adding in a few little treats. With the last batch I made, I decided to make half of the muffins with the regular batter, and half with cocoa powder added for some chocolatey goodness.  I then sprinkled some semi-sweet chocolate chips into some, and walnuts into others.

This one simple batter made four different kinds of muffins in one batch:

–       Banana Walnut

–       Banana Chocolate Chip

–       Chocolate Banana Walnut

–       Double Chocolate Banana

They were all delicious, though my favorite is the simple banana walnut. I’m not going to lie and tell you that these are the most delicious muffins I’ve ever had. That would be a big fat lie, actually.

But these are the easiest and healthiest muffins I’ve ever made at home, and I feel really good about eating them for breakfast or as a snack. They’re really nicely balanced nutrition-wise and they definitely satisfy a craving for baked goods when you’re trying to eat healthy at home (and you’re all out of Sweets From The Earth’s more sophisticated goodies).

Vegan Banana Muffins (adapted from chooseveg.com – a great recipe resource!)

Basic Recipe (makes 12 small muffins):

2 cups whole-wheat pastry flour

1/2 teaspoon sea salt

1 tablespoon baking powder

2 large, very ripe bananas

1 1/4 cups applesauce (I use unsweetened applesauce to keep the sugar content down)

1/2 cup dates

1/2 cup soymilk (I use plain unsweetened soymilk but you can use vanilla for added flavor)

Additions:

Cocoa powder

Chopped walnuts

Mini semi-sweet chocolate chips

Combine the flour, salt, and baking powder in a large bowl.

If you’re going to make the chocolate version in the same batch as the plain ones, divide your flour mixture evenly into two separate bowls. Add about 2-3 tablespoons of cocoa powder to one of the bowls and mix well.

Using a blender, puree the bananas and dates. Add the applesauce and soymilk and mix well.

Pour the banana mixture into the dry ingredients and stir until just moistened. Don’t over mix or you’ll end up with a very dense final product.

If you’ve divided your dry ingredients into chocolate and ‘plain’, try to pour the wet mixture into the two bowls as evenly divided as you can.

Fill non-stick muffin cups with the batter.

To quickly and easily make different versions of the muffins, I spoon one spoonful of batter into a muffin cup, then add either walnuts or chocolate chips, mix with my finger and top with more batter. Then, I use a whole walnut or a small handful of chocolate chips as a garnish (and a visual reminder of what each muffin has inside!).

Bake at 350 degrees for approximately 45 minutes or until lightly brown and firm.

Enjoy without guilt.