Archive | Breakfast RSS feed for this section

Sisterly Pride and a New Favorite Snack

14 Nov

I have three younger sisters and I’m insanely proud of all of their accomplishments and choices in life. It was a life-altering experience that led my youngest sister Jill to a career in holistic nutrition. And aside from my usual sense of pride, I’m also grateful that as a result, she’s introduced me to a whole new world of delicious and health-conscious food.

After overcoming a very serious case of shingles that put her whole life on hold for almost a year, my sister left a stress-inducing career in fashion to go back to school for holistic nutrition. It wasn’t until she took control of her own health and educated herself that she was able to fully heal.

Jill has come a long way and has worked hard to build her new career path. She’s now a practicing holistic nutritionist in Ottawa and will be teaching cooking classes at a clinic called Revivelife. She also works for a great company called Enerjive, which has created a line of healthy snacks: Quinoa Skinny Crackers.

I would never endorse a product I didn’t truly believe in or feel passionate about. But after my sister introduced me to Quinoa Skinnys I fell in love with my new favorite snack. I’ve tried every single flavour, two savory and three sweet, and I’m having a hard time deciding which one is my top pick. It’s a toss up between ‘Heat’ (garlic & cayenne) and ‘Fix’ (chocolate).

The savory flavours really hit the spot when I’m craving something salty and the sweet ones are just sweet enough to curb my afternoon sweet craving without a sugar crash or an overpowering sense of guilt.

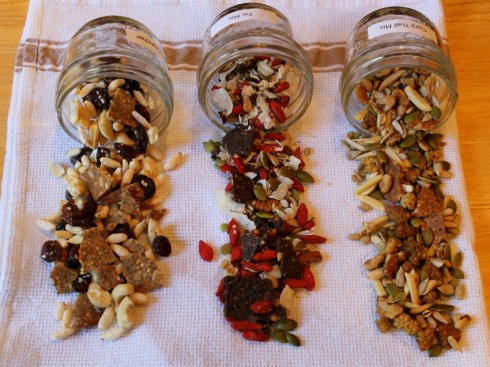
Jill likes to use the rock-salt flavor ‘Crave’ as a crust for baked tilapia. Enerjive has shared some of their own recipes for yummy granola-style mixes below. They sent me samples of each and I liked them so much, I ate them with plain Greek yogurt for breakfast every morning until my stash was gone. And when it was I just crushed up one stick of the apple cinnamon ‘Cozy’ flavor and one stick of the lemon berry ‘Burst’ flavor and tossed the pieces on top of my plain Greek yogurt along with some dried coconut and a drizzle of buckwheat honey (pictured at the top).

Quinoa Skinny Crackers are available at select stores across Canada. Check out Enerjive’s website for store locations and more info.

Giveaway: If you’re dying to try them for yourself, we’ve got one lovely gift basket including all five flavors for one lucky reader (within Ontario only). All you have to do is leave us a comment below telling us about your most favorite healthy snack. We’ll choose one random winner and the gift pack is yours.

Thanks to Enerjive for sharing the following recipes for their three granola-style mixes! (I loved them all, but the salty/sweet Crave Cruncher won my heart)

Each recipe makes 2 cups (6 servings)

Cozy Trail

6 Enerjive apple cinnamon Cozy Skinnys, roughly chopped

½ cup dried mulberries

¼ cup each: walnut pieces and slivered almonds

¼ cup each: sunflower seeds and pumpkin seeds

¼ tsp ground cinnamon

In a large bowl, combine ingredients well. Transfer and store in an airtight container in the refrigerator.

SKINNY TIP: Keep mix in the fridge to retain flavours and freshness and prevent nuts and seeds from going rancid.

Crave Cruncher

6 Enerjive rock salt Crave Skinnys, roughly chopped

1/2 cup raw cashews, roughly chopped

1/3 cup brown rice puffs or quinoa puffs

1/3 cup each: dried cranberries and dark chocolate chips or pieces

2 tbsp sesame seeds

In a large bowl, combine ingredients well. Transfer and store in an airtight container in the refrigerator.

SKINNY TIP: Add crave cruncher to your oatmeal or a top a fruit salad for added crunch!

Fix Mix

6 Enerjive chocolate Fix Skinnys, roughly chopped

¼ cup pecans, roughly chopped

¼ cup each: sunflower seed and pumpkin seeds

¼ cup each: unsweetened coconut flakes and dried goji berries

2 tbsp each: cacao nibs and hemp seeds

In a large bowl, combine ingredients well. Transfer and store in an airtight container in the refrigerator.

SKINNY TIP: For added flavour, toast sunflower and pumpkin seeds before adding into the mix.

Spiced Prunes from The Manse Boutique Inn

28 May

Weekend getaways can be so restorative, especially in a place as magical and charming as Prince Edward County.

Neil and I fell in love with the County a few years ago when we first visited for the annual event Taste the County and then again for The Great Canadian Cheese Festival. Every time we’ve been back since we’ve fallen deeper and deeper for this exceptional region of Ontario.

There’s no shortage of things to do and see from visiting wineries, farms and local artisans, to antique hunting, beach-going, walking the main streets of the small towns, and of course, eating. You do not go hungry when you visit the County. 

With so many local farmers and food producers, there’s a real sense in the County that people truly care about good food and using the freshest local ingredients. 

On our most recent trip to PEC, we had the pleasure of staying at The Manse Boutique Inn in Picton only three weeks after its grand opening and it was absolutely spectacular. Aside from the stunning setting in the century old building, the food at The Manse is definitely a draw thanks to Chef Chris Wylie who runs the inn with his wife Kathleen.

Breakfast is included when you book one of their seven lovely rooms and it was a highlight of our weekend. Chef Wylie smokes his own bacon, cures his own salmon and takes a lot of pride in his food, which was apparent to Neil and I through chatting with him.

Chef Wylie’s delicate cured salmon on potato pancake

House-smoked bacon & the most amazing ‘Hoito pancakes’ at The Manse

He was kind enough to share his recipe for his delicious spiced prunes, which he serves at the breakfast buffet along with thick Greek yogurt and a homemade nutty granola – a perfect breakfast in my books.

Thanks to Chef Wylie for sharing this recipe with Communal Table readers!

Spiced Prunes

500 ml Earl Grey tea

150 ml Marsala wine

100 g brown sugar

Large zest of one orange

1 clove, whole

1 cinnamon stick

1 star anise

250 g prunes

Combine all ingredients, bring to a boil and simmer for 20 minutes. Remove zest and spices. Serve the spiced prunes with the syrup along with yogurt & granola.

Mushroom & Kale Polenta Hash with Eggs

11 Mar

Image

I cherish my weekends. I try to savor every minute of the two glorious days where I can shed (most) responsibility & stress and just be. And savoring them over a delicious brunch is pretty much as good as it gets. 

But Neil and I have made a promise to eat out less and cook at home way more, and that means brunch falls in my hands. 

For some reason, despite being an amazing cook, Neil’s intimidated by breakfast. His creative ideas cease to flow pre-coffee, and just the thought of having to figure out what to eat seems to push him over the edge. Though I don’t mind because breakfast and brunch is definitely my domain. 

I love thinking of interesting breakfast creations, brewing up a pot of good coffee, turning on some weekend-appropriate music and getting to work in the kitchen. 

As much as I love meeting friends for brunch and having someone else cook for me in my down time, taking the time and care to make something beautiful myself and then sitting down with my husband at our own kitchen table to enjoy it, is a bit of weekend bliss. 

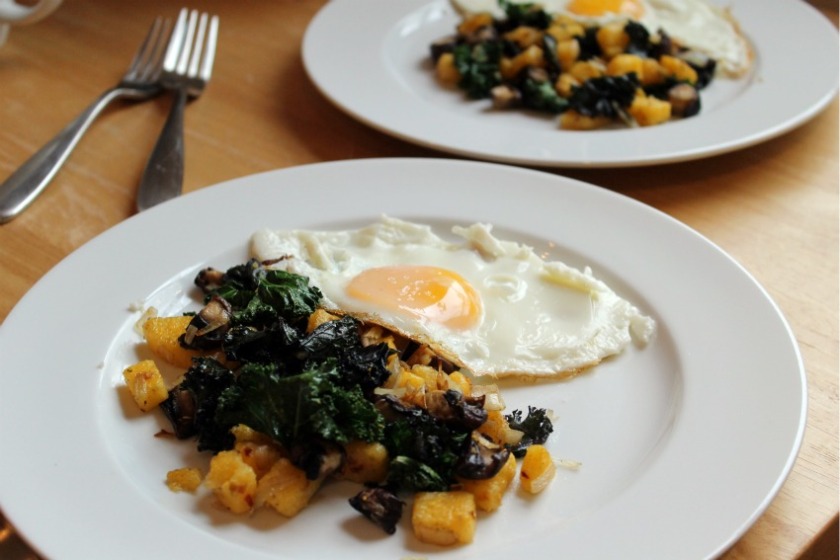
Here’s a quick and delicious brunch that I made yesterday, using what we had in our fridge. 

When I spotted the polenta and mushrooms, I imagined an earthy, savory hash to go with eggs. I cooked the eggs medium so that the yolks were still rich and runny but not too thin or liquid-ey when they broke. There’s something so satisfyingly perfect about breaking a rich egg yolk overtop of savory ingredients and taking a bite of everything together. 

With a cup of dark coffee, I think this brunch stands up to the best of them. 

Oh, and it took about 12 minutes to throw together. Way less than standing in a brunch lineup!

Mushroom & Kale Polenta Hash with Eggs 

1 log of Italian-style pre-cooked polenta

Bunch of kale (I used a mix of red and green)

Cremini mushrooms (I used 2 medium-sized ones for two people)

1 large shallot

Olive oil

Thyme-infused olive oil or fresh or dried thyme

Sea Salt

Pepper

Red chili flakes

Eggs

Image

Cut off a few rounds of the polenta (I used three) and then chop them into small cubes.

Chop the shallot and mushrooms into small pieces and tear the kale into small bite-sized pieces as well.

Heat a bit of olive oil in a pan over medium heat and sauté the shallot for a few minutes, seasoning with a bit of salt. Add in the kale and mushrooms and cook for a few more minutes before adding in the polenta cubes. Sautee everything together, season with pepper and a few chili flakes.

I drizzled just a little bit of Nudo’s thyme-infused olive oil into the hash, which added such a great earthy compliment to the mushrooms and kale. You could use some dried or fresh thyme instead, but only use a little bit so as not to overwhelm.

Cook on medium-low heat until the polenta cubes are a bit crispy on the outside.

Meanwhile, heat another pan and cook a few eggs sunny-side up. I cooked ours to medium so the yolk was still gloopy and runny, but not too liquid-ey.

Plate the polenta ‘hash’ and top with eggs.

Happy weekend!

Brie & Strawberry Jam Omelet with Strawberry Panzanella Salad

13 Apr

It’s been a little quieter than usual around here lately. We’ve been dealing with some career changes and general life shifts, not to mention unavoidable winter colds and flu bugs over the last few months. All of that has been keeping us more occupied in ‘real life’, which has meant less time for us to devote to our blogging life and cooking in general.

We’re slowly getting back into a groove, but the last few weeks we’ve been leaning towards cooking meals that are simple and fast while still being interesting.

Last week I reached into my ‘archives’ when we wanted to make a meatless dinner that was in line with the changing weather and freshness of spring.

I discovered the unexpected pleasure of the brie and strawberry jam omelet many years ago on a visit to Montreal. It stood out for me on the brunch menu at Orange Café in the NDG area of my hometown. I rarely use this adjective when describing food, but I have to say that this is one ‘sexy’ omelet. It’s the perfect combination of textures, flavors and even colors on the plate. I even made it for Neil when we first started dating in an attempt to impress his advanced palate.

Once I started making it at home for brunch and dinner, the very idea of it inspired other omelet combinations like cheddar and spicy mango chutney, or havarti and pear & ginger preserves.

But this one’s the ultimate. L’original.

This time around I used goat brie for a little more earthiness and Greaves Rhubarb Strawberry Jam, which I absolutely love. There’s not much to this simple omelet, but the key for me is using just the egg whites. With the egg whites providing a neutral base, the cheese and jam really shine and stand out. I also like the texture of an all-egg white omelet better than what you get when you include the yolks.

But we needed a side dish. Something that could stand up to the fabulousness of the omelet and complement it at the same time.

Somehow the idea of a fresh strawberry panzanella came to me. Panzanella is a rustic Italian bread salad that’s usually made with stale bread, tomatoes, onions and a simple vinaigrette. I always order it when I spot it on restaurant menus because it’s usually delicious, however simple.

Neil was the one who actually executed our take on the classic salad after we talked about some ideas, and it turned out even better than I had hoped. The sweetness of the fresh strawberries worked so well with the tartness of the balsamic and the shreds of basil. And we actually used fresh bread instead of day-old and found that it gave a really nice spongy consistency on the inside, and a toasty crunch on the outside. It was a great texture combination and the flavors of each ingredient came through. It really was a great complement to the omelet. We ooh’ed and ahh’ed with every fresh, tasty and flavorful bite.

What better way to welcome spring to our table?!

Brie & Strawberry Jam Omelet with Strawberry Panzanella Salad (serves 2)

For Strawberry Panzanella Salad:

Approx 8 fresh strawberries (3-4 per person)

Good quality balsamic vinegar

Pepper

Approx 3/4 to half a loaf of crusty bread (we used Brick Street Bakery‘s wheat bread)

Olive oil

Sea Salt

1 clove garlic, sliced into thin slices

1 handful of basil leaves, chopped

Cucumber, chopped

Arugula

For Omelet:

Approx 6-7 thick slices of brie (we used goat brie)

Good quality strawberry jam (we used rhubarb strawberry)

Approx 6-8 egg whites (I actually used egg whites from a carton – so much easier!)

Cooking spray

To Assemble Salad:

Slice the strawberries and add them to a bowl with a couple of tablespoons of good balsamic vinegar and a grind of pepper. Leave to marinate for 30 minutes to an hour.

Cut the bread into cubes and toss with a few drizzles of olive oil and a few grinds of sea salt.

Slice the garlic into thin slices that will be easy to remove later from the pan.

Heat a small amount of olive oil in a pan on medium heat and cook garlic for a few minutes. Lower the heat to medium low, add bread cubes into pan and cook for a good 7-10 minutes until nice and brown on the outside.

Remove the bread cubes from the pan, leaving the garlic behind, and set aside to cool.

When ready to assemble, add the cooled bread cubes to a bowl. Add in a little bit of arugula. You don’t want to add as much as you would in a regular salad, the bread and strawberries are the main ingredients here. Add the chopped cucumber and basil. Drizzle in some good quality olive oil and toss into the salad with a little bit of sea salt.

Spoon the balsamic strawberries into the salad, reserving some of the liquid. Mix the salad and taste. Add more of the balsamic to taste. Toss everything together well and serve.

To Assemble Omelet:

Spray an omelet pan with a little bit of cooking spray and heat the pan over medium low heat.

Add in the egg whites and leave them for a few minutes to firm up. Slide a thin spatula around the edges to lift and separate from the pan.

Layer the slices of brie down the middle of the omelet or just off to one side, depending on how you like to fold your omelet. I decided to fold the two sides in so I layered my ingredients into the middle but you can also attempt to flip one side onto the other. Spoon a generous amount of jam onto the brie.

Fold in the sides and slide the spatula underneath to loosen the omelet from the bottom of the pan. Let it cook for a few minutes to let the cheese melt and jam warm through. If you’re feeling daring, you can flip the omelet over and let it cook on the other side for a few seconds so the brie melts on both ends and the jam gets sticky and cooks as it oozes out of the edges.

Cut the omelet in half to serve two and plate with some Strawberry Panzanella salad.

Eggs Benny with Zucchini Latkes and Smoked Paprika Hollandaise

12 Mar

Zucchini Benedict Smoked Paprika Hollandaise

Last week, I finally got around to creating a dedicated recipe page for Communal Table, something Jenny and I had talked about doing for a while as a way to make it easier for readers to check out the recipes we post here without having to read through all our posts. In the process of doing that, I spent time going through everything we’ve posted over the past year and categorizing our recipes by main ingredient. Out of the 33 recipes we’ve posted, only about a dozen have included meat, fish or seafood.

Jenny’s been a significant influence on both my cooking and eating habits, in terms of easing me out of my tendency toward cooking with – and eating – meat. I’ve always understood that eating less meat and more vegetarian protein is a good thing, but it wasn’t until we met and she brought the appreciation for cooking without meat to our relationship that I really began to think about it.

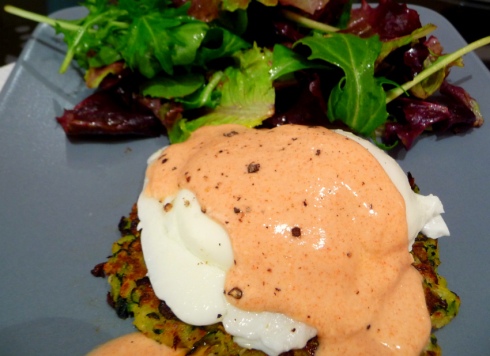
In the spirit of cooking with less meat, this one’s another egg recipe. File this one under recipe ideas that come into my brain randomly while I’m trying to be productive at work but really thinking about food. Eggs benedict is one of my favourite breakfast dishes, but it’s something I rarely allow myself to eat anymore now that I understand the fat and sodium content of delicious ham and hollandaise sauce, and the complete lack of nutritional value in an English muffin. In this recipe, a zucchini latke takes the place of the English muffin, while the heavy hollandaise sauce is replaced with a light smoked paprika yogurt sauce that turned out, frankly, to be just as satisfying as hollandaise.

As an aside, I’ve never made latkes and wanted these to be healthier than the traditional oil-fried ones. So I did a google search for baked zucchini latkes, followed the recipe I found, and expected it to turn out great. It didn’t. They didn’t brown and ended up a bit of a mess after an extended cooking time in the oven. I have a few theories as to why this happened, the most logical being that I was too rushed trying to make this recipe on a weeknight and didn’t take the time to squeeze enough liquid from the zucchini and onion, which prevented adequate browning. Nevertheless, these came out of the oven and ended up in the frying pan where they turned out great. The recipe below reflects the successful frying pan method, but I’m still determined to find a workable baked zucchini latke recipe – if anyone out there has one, let me know.

The recipe below made enough for three servings of two bennys each, with a couple of latkes leftover.

Eggs Benedict with Zucchini Latkes and Smoked Paprika Hollandaise

For zucchini latkes:

4 large zucchini
1 onion
2 eggs
½ C flour
¼ C breadcrumbs
1 tsp baking powder

Grate zucchini and onion (we used a box grater, but a food processor would probably be even better). Wrap grated zucchini and onion in a clean kitchen towel and squeeze as much moisture out as you can. This will take several minutes, but is totally worth the effort (as I mention above).

Crack eggs into a mixing bowl. Add zucchini and onion to bowl, along with all dry ingredients and generous grinds of salt and pepper. Mix everything together well. Form into flat round discs and fry in enough oil to cover the bottom of a pan, over medium-high heat. Cook a few minutes per side until nicely browned.

For smoked paprika hollandaise:

In a bowl, mix together a few tablespoons of plain 1% yogurt, the juice of half a lemon (we used a Meyer, which added a bit more sweetness), a squirt of sriracha, half a teaspoon of smoked paprika and a pinch of sugar. The lack of precise measurements in this recipe is because we basically just made it to taste, which I find is the easiest way to prepare a sauce. As long as you start with a sufficient amount of yogurt for the number of benedict servings you’re preparing, and enough smoked paprika to get the smoky flavour you want in this, the sauce will turn out fine.

To prepare benedict, place zucchini latkes on plates (we served two per person), top each with a poached egg and a generous spoonful of the smoked paprika hollandaise. Serve with a simple green salad for a light, delicious meal that even the biggest meat eater will enjoy.

The Best Scrambled Eggs with Smoked Salmon & Horseradish Cream

26 Dec

Eggs are one of those things that everyone has their own method of cooking. And scrambled eggs, though they seem so simple, can be made a million different ways.

Well, if you’ve got 30 minutes to spare and you want to try the creamiest, most delicious scrambled eggs you’ve ever had, read on.

Yes, I realize that scrambled eggs can be cooked in a matter of minutes so I know it may seem like an unnecessary ordeal to spend 30 minutes on such an easy dish. But cooking these eggs slowly on a low heat is what makes them so perfect. It’s worth the wait.

A lot of people add milk or cream to their eggs to get that creamy consistency, but with this method, you don’t have to add a thing. When they’re done, the eggs are creamy, silky, dense and melt-in-your-mouth amazing. They also turn a darker color than your typical quick-cooked fluffy scrambled eggs, so they look more intense and rich.

The leek is essential because it cooks down to be soft and kind of melty and adds a lot of flavor and texture to the eggs. I love chopping and cooking leeks; they’re so beautiful and delicious.

You need to babysit the eggs as they cook and keep stirring them in the pan with a soft spatula. You may get to the point of annoyance thinking that they’re never going to start firming up, but whatever you do, stay strong, keep going and do not turn up the heat! They’ll cook in no time (aka: 20 minutes) and you’ll be glad you waited it out as you indulge in every bite.

The smoked salmon and horseradish cream just take the eggs over the top. We’ve served this to friends for brunch with some fresh crusty bread and they were very impressed. I decided not to tell them how incredibly easy it was to pull together.

All you need is a little patience…

Scrambled Eggs with Smoked Salmon and Horseradish Cream

6 eggs (3 per person)

1 large leek, dark green tops removed

Olive oil

2 Tbsp sour cream (I used light sour cream, you can also use plain yogurt)

1 heaping tsp prepared white horseradish (or to taste)

Lemon zest (optional)

Smoked salmon (I used gravlax with dill)

Slice the leek in half lengthwise, run under cold water, separating the layers to clean out any dirt. Dry and slice into half-moon pieces.

In a bowl, mix the sour cream and horseradish. Add some freshly grated lemon zest and set aside.

Crack the eggs into a large mixing bowl and whisk to blend.

Add a good amount of olive oil to a large pan on medium heat and sauté the leeks for 10 minutes. You really want to cook them down to be soft and melty in consistency. You don’t want them to brown so watch the heat and keep them moving in the pan as you sauté.

Once the leeks are ready, lower the heat to a low setting and wait about a minute before adding the eggs, to bring down the temperature in the pan. Whisk the eggs one more time and then add them into the pan with the leeks.

The eggs now need to cook very slowly on that low heat for about 15-20 minutes.

You may get fed up but the final result is completely worth the effort, so keep on going… Don’t touch that knob!

Keep it on low and cook slow…

Using a soft spatula, keep moving the eggs around the pan in circular motions as they slowly cook. Let them sit undisturbed for a few seconds and then mix them around again. Repeat!

It takes a while before they start to transition from liquid form, but keep on cooking!

The eggs are ready once all the liquid cooks and the eggs are solid. You want them to be creamy so don’t overcook them to the point where they’re very firm and dry. You want them to be moist. Add salt and pepper just before you’re ready to plate.

Plate the eggs and top with pieces of smoked salmon. Add a dollop of horseradish cream and serve.

Vegan Muffins: One Batter, Four Ways

13 Dec

I just may be the only non-vegan writing about vegan-friendly and healthy baked goods during the holiday season. But it’s exactly the right time of year, for me anyway, to be looking for healthy alternatives in the face of so much holiday excess.

I’m not a vegan or even a vegetarian, but I do love alternative recipes, interesting textures and different, healthful ways of looking at food. I tend to go for vegetarian options more often than not, simply because I love the fresh ingredients and flavors that they’re typically made with. Anything gluten-free, vegan or raw will always catch my attention – though not at the expense of giving up a good burger or charcuterie plate.

See? You really can have it all! At least when it comes to food.

I have a little thing for all of the vegan and gluten-free goodies from Sweets from the Earth. Their lavender-chocolate cupcakes and organic medjool date squares are decadent pieces of heaven. One bite of any of their treats will make you forget you’re eating a healthier alternative to traditional baked goods, and I very much appreciate that.

Well, I’m no professional baker but I did find a simple recipe for vegan banana muffins that I could make easily at home, and they’ve become a staple. After reading through a bunch of recipes online, this one really stood out to me because of the minimal ingredients and the fact that there’s absolutely no refined sugar in the batter. These muffins are sweetened with dates and applesauce, and have soymilk in them for a bit of added protein and richness.

I’ve taken the recipe further by adding in a few little treats. With the last batch I made, I decided to make half of the muffins with the regular batter, and half with cocoa powder added for some chocolatey goodness.  I then sprinkled some semi-sweet chocolate chips into some, and walnuts into others.

This one simple batter made four different kinds of muffins in one batch:

–       Banana Walnut

–       Banana Chocolate Chip

–       Chocolate Banana Walnut

–       Double Chocolate Banana

They were all delicious, though my favorite is the simple banana walnut. I’m not going to lie and tell you that these are the most delicious muffins I’ve ever had. That would be a big fat lie, actually.

But these are the easiest and healthiest muffins I’ve ever made at home, and I feel really good about eating them for breakfast or as a snack. They’re really nicely balanced nutrition-wise and they definitely satisfy a craving for baked goods when you’re trying to eat healthy at home (and you’re all out of Sweets From The Earth’s more sophisticated goodies).

Vegan Banana Muffins (adapted from chooseveg.com – a great recipe resource!)

Basic Recipe (makes 12 small muffins):

2 cups whole-wheat pastry flour

1/2 teaspoon sea salt

1 tablespoon baking powder

2 large, very ripe bananas

1 1/4 cups applesauce (I use unsweetened applesauce to keep the sugar content down)

1/2 cup dates

1/2 cup soymilk (I use plain unsweetened soymilk but you can use vanilla for added flavor)

Additions:

Cocoa powder

Chopped walnuts

Mini semi-sweet chocolate chips

Combine the flour, salt, and baking powder in a large bowl.

If you’re going to make the chocolate version in the same batch as the plain ones, divide your flour mixture evenly into two separate bowls. Add about 2-3 tablespoons of cocoa powder to one of the bowls and mix well.

Using a blender, puree the bananas and dates. Add the applesauce and soymilk and mix well.

Pour the banana mixture into the dry ingredients and stir until just moistened. Don’t over mix or you’ll end up with a very dense final product.

If you’ve divided your dry ingredients into chocolate and ‘plain’, try to pour the wet mixture into the two bowls as evenly divided as you can.

Fill non-stick muffin cups with the batter.

To quickly and easily make different versions of the muffins, I spoon one spoonful of batter into a muffin cup, then add either walnuts or chocolate chips, mix with my finger and top with more batter. Then, I use a whole walnut or a small handful of chocolate chips as a garnish (and a visual reminder of what each muffin has inside!).

Bake at 350 degrees for approximately 45 minutes or until lightly brown and firm.

Enjoy without guilt.

Strange Brew at Mercury Espresso Bar

6 Dec

For Neil and I, a cup of coffee is never just a cup of coffee. Sure, there’s utilitarian coffee-chain brew for mornings when you desperately need a jolt or a quick fix to satiate your caffeine addiction, but you pretty much know what you’re going to get; flavorless, too strong and bitter, or too weak and watery muck.

Call it coffee snobbery if you will, but if there’s any time to be picky, for us anyway, it’s with our favorite vice. We covet a truly great brew where you can taste the nuances in the beans and the layers of flavor.

We do have a drip coffee maker at home, but in the last year or so we’ve really been digging our French press and other methods like the classic Italian stovetop pot. We’re also always on the hunt for great beans and we usually grind them fresh and like to buy small batches of locally roasted ones (our current fave is Ideal Coffee’s Prince of Darkness).

We have a bunch of favorite coffee shops around Toronto, with Broadview Espresso and Mercury Espresso Bar (both conveniently in the east end) topping the list. When I saw that Mercury was offering up two completely new (to me anyway) and seemingly strange ways of brewing coffee, I knew a little taste test experiment was in order.

The staff at Mercury are more than just a bunch of hipsters jumping on the indie coffee shop train. They all seem to be really enthusiastic about coffee and very knowledgeable about various methods and beans. And they were all too happy to show us the ropes with their two unique methods of brewing coffee: The siphon and the chemex.

It was suggested that we try both methods with the same Indonesian beans so we could really taste the difference between each cup.

We started with the siphon, which brought back memories of science class and Bunsen burners.

The bottom glass bulb is filled with water and heated with a butane flame. The water boils and shoots up into the top chamber where the grinds sit, separated by a filter. The water and grinds mix, you put out the flame and freshly brewed coffee falls back into the bottom chamber.

The siphon promises a “very clean, delicate and crisp” brew, which is right on the money. The coffee was really more like tea – not watered down, just light and clean, and surprisingly sweet. Neil felt that his needed a touch of cream and sugar to round out the taste, but I drank mine black and really loved the interesting tea-like consistency.

Next came the chemex, which is somewhat reminiscent of a wine carafe and requires an exact, timed preparation.

It takes a large paper filter that’s folded over three times to form a cone that sits in the beaker. You need to wet the filter with hot water to remove any paper taste and to seal it in. It takes a coarser grind than the siphon, and the grinds sit right in the cone. You pour just a little boiled water onto the grinds to wet them, and then wait 30 seconds to let the grinds ‘bloom’ (I love that descriptive; the grinds really do puff up and bloom as they take in the water). Then, the rest of the water should be poured in very slowly and steadily over three and a half minutes.

This is serious business at Mercury; a timer was used and the chemex was never left unattended as the water was poured ever so carefully in equal amounts. Once all the water goes through, you let the coffee sit to allow for every last drop to come through.

The coffee produced by the chemex was delicious and, amazingly, so different than the siphon. It had a much more syrupy consistency – a lot darker like espresso, though not heavy. It produced a flavor that was intense but still very clean. It was strong but not overpowering and it tasted richer and spicier than the siphon brew.

Darker chemex brew in background & lighter siphon brew in foreground

It was amazing to taste two completely different flavor profiles from the same beans. The siphon brought out the honey, citrusy notes of the beans and the chemex brought out spicier ones.  Neil drank his black with a touch of sugar (like he would espresso) and I drank mine black at first and then added some milk near the end and enjoyed it both ways.

This may seem like a whole lot of hoopla for a simple cup of coffee, but it was totally worth it. We really did experience different flavors and consistencies through the different methods and found an appreciation for both.

You can try out one or both of these methods at Mercury after 2 p.m. (the busier hours are reserved for the more common lattes and americanos), and the food nerd in me highly recommends trying both out for a fun and really cool taste experience.

Thanks to the weekend staff at Mercury for walking us through each process with a ton of enthusiasm and passion!

Holiday Giveaway #1: New PC Insider’s Report Products from Loblaws

30 Nov

One of the things I love most about the holidays is the excitement that builds in my mind around traditions. Over the years as my family circle evolved, our holiday traditions did too. My parents’ divorce, relatives passing away, my moving away from home and other events led to new ways of celebrating the holidays. But no matter what’s happened, some things that I’ve grown to look forward to at Christmas haven’t changed. My mom and relatives always put out far-too-indulgent feasts of delicious food, I always make sure to get in at least one viewing of A Christmas Story, and as far as I’m concerned, Christmas isn’t officially over until I get to hear The Pogues’ Fairytale of New York at least a dozen times.

Another holiday tradition I’ve looked forward to for as long as I remember is the President’s Choice Insider’s Report. Since I was a kid, I’ve always loved reading through the pages of the Insider’s Report, with its descriptions of products reading more like stories than marketing copy. As a kid, I knew that the arrival of the Insider’s Report in the Saturday paper meant it was only a matter of time before delicious treats began making their way into our kitchen… PC Egg Nog, Chocolate Fudge Crackle Ice Cream, PC smoked salmon on Christmas morning.

So it seems fitting that Communal Table’s first 2010 holiday giveaway is a selection of products from the latest edition of the PC Holiday Insider’s Report. We have a package of goodies that would go great with a morning of opening presents… or would make pretty good gifts themselves. Here’s what you can win:

  • A 1 lb. package of of new PC 100% single origin Hawaiian fine-grind coffee (Jenny and I are currently working our way through a package of this stuff; it’s medium bodied and flavourful – perfect for weekends!)
  • A 425 g jar of PC The World’s Best Jumbo Cashews
  • A box of the new PC Gourmet Belgian Chocolate Collection (30 chocolates in six flavours)
  • A box of the new PC Chocolate Fruit Fancies, which  are milk or dark chocolate ganache and fruit puree enrobed in Belgian chocolate

This stuff all looks delicious, and to be honest I’d love to keep it and eat it all myself. But Jenny won’t let me, so we’re giving it all away to one lucky reader. All you have to do to enter this contest is this: Leave a comment below this post and let us know what your favorite holiday traditions are (Canadian entries only for this one). That’s it. We’ll pick a name at random from all comments left on this post by Monday, December 6, and announce the winner here next Tuesday, when we’ll also announce our next holiday giveaway prize (yep, we have more holiday surprises coming!)

Also, don’t forget about Communal Table’s donation drive on behalf of the Daily Bread Food Bank… all donations made are eligible to win a $200 gift certificate to North 44 Restaurant in Toronto and a signed copy of chef Mark McEwan’s new cookbook, Good Food at Home.  Click here for details on how you can donate and win with Communal Table.

Better With Bacon: Skillet Bacon Spread

23 Nov

Skillet Bacon Spread

It’s certainly been a while since our last installment of Better With Bacon. Far too long, as far as I’m concerned. I’ve been sorely deficient in my bacon intake lately. So it’s appropriate that the bacon product featured this time around is so versatile (read: can be easily incorporated into basically any meal). Skillet Bacon Spread is essentially a bacon “jam” – spreadable, slightly sweet, and full of delicious bacon. It was created about three years ago by Josh Henderson, the man behind Skillet Street Food, a Seattle-based fleet of street food trucks. He initially created the recipe to serve as a condiment on the company’s burgers. But as bacon became fairly recognized as the delicious food group it is and the popularity of the spread grew (a mention by Martha Stewart didn’t hurt), Skillet Street Food began packaging and shipping it all over the place.

The Skillet team takes onions, balsamic vinegar, brown sugar, spices, and of course bacon, cooks everything down for about six hours and then quickly purees it so it’s smooth and spreadable, but still retains a nice texture and an appearance that still allows it to be recognizable as food. (Truthfully, it looks like something you’d serve your dog, but I’m not sure you’d get a much prettier result from cooking down and pureeing these ingredients in your home kitchen).

Eaten right off the spoon, Skillet Bacon Spread definitely has the smoky flavour of bacon, which is obviously helped by the fact that there are actual chunks of cooked bacon in the  mix. While the look of the spread doesn’t immediately scream “bacon!” the fact you’re guaranteed to bite into actual pieces of bacon lets you know this is the real thing. Unfortunately, the bite from the balsamic vinegar and the slight sweet kick from the rendered onions and brown sugar overwhelm the flavour a bit. But in a grilled cheese sandwich or spread on some toasted bread and topped with a fried egg, the other flavours become muted and the bacon flavour jumps out quite a bit. I can also definitely imagine it tossed into pasta, and while the combo of onions and balsamic aren’t going to work in my ice cream maker, I think this would make a great ingredient in a savory cookie or scone.

Skillet Bacon Spread

I was first turned on to the idea of bacon jam by Toronto’s Niagara Street Cafe, which I had heard served a jammified bacon concoction in some of its brunch dishes. Unfortunately, Niagara Street Cafe stopped serving brunch before I got the chance to check it out. But my sister, who had tasted the restaurant’s bacon jam at brunch, attempted a bacon jam recipe of her own last year. While hers was delicious, the process of prepping and cooking down the ingredients seemed messy and time-consuming. One of these days when I have an abundance of time and bacon, I’m definitely going to create a bacon jam of my own. In the meantime, it’s nice to know that there’s a prepared, packaged product that just an online order away. And speaking as a bacon lover with an eye on the holidays, I can’t imagine many stocking stuffers I’d appreciate better than a jar full of bacon. If you want to order me some as a present – or even for yourself – you can do so here.

** UPDATE (Aug 2011) – Skillet Bacon Spread is now available in Toronto at Ruby Eats in Leslieville!