Archive | Quick Meal RSS feed for this section

The Best Kale Salad with Sweet Sesame Dressing

14 Mar

Kale has become a hot & trendy little vegetable lately, which is fine by me because I love finding it on restaurant menus everywhere I go. But I’ve been a kale admirer for many years and it’ll continue to be my favorite leafy green even when its fifteen minutes of foodie fame are up.

I absolutely love this powerhouse vegetable. Every time I eat raw kale I feel amazing inside. It’s the only food that has an almost instant effect, making me feel like I’m doing my body good by eating it. And it tastes amazing! It’s so earthy and hearty and the flavor changes and intensifies based on what you do with it.

I love it roasted, steamed, sautéed, juiced, baked, and, of course, in ‘chip’ form, but the best way to eat kale is most definitely raw.

I sometimes like to just toss it with olive oil, sea salt, lemon and a touch of maple syrup; but this easy sesame dressing is one of my all-time favorites and it stands up to and pairs so nicely with the boldness of kale.

I make this sesame dressing often. When I feel like cleaning a slightly bigger mess, I use a blender to mix it, which gives a really nice, smooth and creamy consistency. But when I don’t have the patience, I just whisk it up in a small bowl and add the hot water in a little bit at a time while whisking to smooth it out.

The photos here show a dinner salad that I made last week with a mix of red and green kale, raw cauliflower and crunchy bean sprouts. Kale is a great green to eat as a meal because it’s so filling and full of goodness. And it holds up nicely as a weekday take-to-work lunch salad because it doesn’t really get soggy like other lettuces when it’s dressed. 

This dressing would also be amazing on sautéed or steamed spinach with some sesame seeds sprinkled on top.

Kale Salad with Sweet Sesame Dressing

Bunch of kale, washed & torn into bite sized pieces

¼ cup tahini

2 tbsp tamari soy

2 tbsp agave

Hot water, to taste (to thin out the dressing)

Sesame seeds – optional, for sprinkling

Use a blender or a small mixing bowl and whisk. Mix the tahini, tamari soy and agave until blended. Add in hot water a little bit at a time until you get a consistency that you like.

Toss kale with sesame dressing and sprinkle with sesame seeds. 

* I did find this general recipe online somewhere a few years ago but I can’t remember where it came from so I can’t source it properly. 

Thrown Together: Spinach Salad with Pomelo, Seared Scallops & Calamari

21 Feb

Life is busy. That is one constant in my life that I don’t see shifting anytime soon. Even without kids, it often feels like my head is spinning all day long just trying to get everything done.

So despite loving to cook, we more often than not scramble to get dinner on the table and during a busy week it can feel like more like a chore than a pleasure. Some nights a bowl of cereal looks mighty appealing when weighing the effort, time and thought that has to go into making anything else.

But we often find on those unmotivated nights that when we push ourselves to think of/create easy dishes that don’t require a ton of time or clean up, we feel so much happier in the end that we resisted pulling out the cereal boxes (or our even-worse habit of just going out to eat instead). 

Last week we had just that kind of night. Leaving work after a long and brain-draining day (followed by an even more draining yoga class), the last thing I wanted to do was stop at the grocery store and wrack my brain for what to make for dinner. But somehow I pushed myself to go.

I was in one of those no-mood-in-particular moods (read: totally indecisive) and when I called Neil to try to force him to tell me what to buy, I found him to be in exactly the same state.

There was talk of buying frozen pizza (yes, we have been known to go for that kind of lazy convenience – we are human, after all) or defaulting to our usual go-to eggs for dinner, but when I walked by the fish counter I was reminded how easy it is to quickly cook up fish and seafood, and I finally got a spark of inspiration.

I bought four scallops and a few pieces of calamari. I remembered that I had a beautifully sweet pink pomelo waiting for me at home (a bit of an obsession this time of year – they smell amazing and taste even better!) which sparked the idea of throwing together a really easy salad. I grabbed some fresh spinach – earthy spinach, sweet pomelo, meaty seafood, tangy dressing – the only thing missing, in my mind, was something pickle-y. So after grabbing a few pickled hot peppers from the antipasti bar (they were hot yet sweet) I raced to the checkout and then home.

Neil was skeptical about how this meal was going to come together (fish? fruit? pickled peppers?). But once we threw it all together – Neil in charge of searing the fish, me in charge of prepping everything else – and sat down to the first bite, we were immediately happy that we saved the cereal for breakfast and opted for this quick, beautiful, fresh and balanced home-cooked meal.

Here’s what we used:

4 large scallops

3 pieces of raw squid and a few tentacles

1 pink pomelo, peeled with the white membrane removed and flesh cut into small pieces

Handful of hot/sweet pickled peppers

1 garlic clove, minced

Juice of 1 lime

Really good, strong & fruity olive oil

Salt and pepper

Here’s how we did it:

Neil brushed the scallops and calamari with a bit of olive oil and seasoned the scallops with salt, pepper and some fennel pollen. You can use any combo of spices to season up your scallops. He heated a cast iron pan until it was pretty hot and then seared the scallops for about 2-3 min per side, then removed them and cooked the calamari in the same pan until it was cooked but not overdone (a couple minutes per side should do it). 

Meanwhile, I opened a bottle of white wine, tore into the pomelo and cut up the sweet flesh into small bite sized pieces. (**Note – the pomelo is a deliciously sweet citrus fruit that taste like a more mild version of grapefruit. It’s so refreshing and lovely but with it’s abundantly squishy/spongy peel and coarse membrane it’s a total pain in the butt to peel. Here’s a great step-by-step on how to tackle it)

I then made a quick dressing mixing the olive oil, garlic and lime juice until really well-incorporated. I chopped up the pickled peppers into small pieces and added them to the spinach. I tossed the spinach and peppers with the dressing, plated big portions onto two plates, and added the pomelo on top.

Neil cut the calamari into small bite-sized pieces and placed a handful onto each plate along with 2 scallops each.

We sat, we ate, we drank wine, we talked and enjoyed each other’s company at the end of a long day. And after we reveled in how well the flavors of this cobbled-together salad came together in the end, we thanked each other for not giving into the cereal/frozen pizza trap and opting for something unique and fresh instead. 

Creamy Whole Wheat Pasta with Smoked Salmon & Chives

7 Feb

Smoked salmon has become a bit of a staple in our house. Aside from being one of my favorite brunch foods (eaten on a toasted Montreal bagel with cream cheese, lemon & capers, of course) it’s a great ingredient to keep on hand in your freezer for a really quick weeknight meal.

We usually default to this quickly assembled dinner, but last week we thought we’d try something a little different but equally fast and simple.

We made this pasta up as we went along, grabbing a handful of ingredients that felt like obvious companions to the smoked salmon. The soft, salty/smoky salmon worked so nicely with the slight tang of the Dijon, the sweetness of the caramelized fennel and shallot, and the fresh hint of onion from the chives. The nuttiness of the whole wheat pasta really made a difference, too.

I usually squirm when Neil suggests adding cream to a dish we cook at home, since I’ve been conditioned to think that cream sauces are evil and will go directly to my thighs without being ‘worth it’. But as Neil pointed out, a little goes a long way in this pasta. You don’t need to create a full-on sauce, dousing the pasta in cream. Just use enough to lightly coat the bottom of the pan, and you won’t be riddled with the kind of guilt that the likes of fettuccini alfredo inevitably leave behind. 

Creamy Whole Wheat Pasta with Smoked Salmon & Chives 

Whole wheat pasta, cooked al dente and strained

1 pkg smoked salmon, chopped into small bite sized pieces

2 shallots, chopped

Half a bulb of fennel, chopped

Handful of fresh chives, chopped

1 tbsp Dijon mustard

Approx ½ cup half-and-half cream

Splash of white wine

Olive oil

Salt and pepper

Heat olive oil in a large pan on medium heat. Sauté fennel and shallot until they’re soft and caramelized. Season with salt and pepper. 

Add some white wine and cook for another few minutes. Mix in the Dijon mustard and half of your chopped chives, keeping the rest to garnish.

Reduce the heat to low, add in the cream and mix. To be honest, we eyeballed the cream (with me on the sidelines reminding Neil not to add too much!) but probably ended up with just about a half a cup. Enough to coat the pasta but the goal is not to create a full-blown sauce. Make sure you’re heat is down on low so the cream doesn’t curdle.

Add in your cooked pasta while it’s still warm. Toss in the pan to coat the pasta evenly with the sauce. Add in the smoked salmon at the last minute – you don’t want to cook it but you want to incorporate it. 

Serve sprinkled with the rest of the chives. We drizzled our plates with some lemon-infused olive oil, but a little squeeze of fresh lemon juice would be perfect too. 

Cacio e Pepe: Simple, Quick and Delicious

26 Oct

cacio e pepe pepper cheese spaghetti

It’s a strange thing, this food blogging life. If you’re like us, you start out wanting to create some recipes and share food adventures through your blog. Eventually, you start to gain a bit of a following, and those followers start commenting about how they like your recipes, and enjoy reading your blog. And that excites you and pushes you to create even better recipes, and share more food adventures. But then, life happens—work, family, social commitments and, yes, laziness—and you can’t find the time to dream up great recipes to share with readers, and those readers start to move along (though a lot of you have stuck with us through the silence, and we really appreciate it).

Of course, a blog post doesn’t have to be long to be interesting, and a recipe doesn’t have to be complicated to be delicious. So with that in mind, here’s a quick look at a pasta dish that I’ve enjoyed for years, but for some reason had never made myself until recently: cacio e pepe.

This dish is incredibly simple, and almost insultingly so when you’re paying $12 for it in a restaurant (and yet I’m often guilty of doing just that when I see it on a menu). It’s pasta, pepper, pecorino cheese, and nothing else. Think of it as Italian KD—the nutritional value is minimal, but the flavours are comforting. There are really only two rules here—you must start with whole peppercorns, and you must use freshly grated cheese.

Here’s how you do it:

Boil a pot of water for the pasta. When the water is boiling, add a whole bunch of salt. You always want to add a good amount of salt to pasta water, but that’s especially true for cacio e pepe, since salty noodles add to the flavour of the finished dish. Throw in a package of spaghetti and let it cook to al dente. When the pasta is finished cooking, reserve about a half cup of pasta water and drain the noodles.

While the noodles are boiling, grind a tablespoon of peppercorns (or more if you like heat!). Even better, break them up with a mortar and pestle, which will crack the peppercorns into irregular sizes.

Next, grate a cup of pecorino romano cheese. (You want to finely grate the cheese for this, since a coarser grate can clump when you put together the final dish). You could use parmesan in a pinch, but the salty, earthy bite from the sheep’s milk-based pecorino really makes cacio e pepe what it is. Mix the pepper and cheese together in the same bowl.

Put the drained noodles back into the pasta pot, and toss with a handful of the pepper-cheese mixture. Add in a couple tablespoons of the pasta water (which will help the pepper and cheese stick, and the starch it retains from boiling the noodles will add creaminess to the sauce), and toss pasta with the rest of the pepper and cheese.

Serve as a side dish with meat, as a main with a salad… or on its own, nutritional value be damned.

cacio e pepe pasta pepper cheese spaghetti

Pan-Seared Watermelon with Salmon and Mint Chimichurri

15 Aug


seared watermelon salmon mint chimichurri

Last fall, I picked up a copy of Mark Bittman’s then-new book, The Food Matters Cookbook. I was feeling like my diet needed a bit of a shakeup, and I was drawn to Bittman’s philosophy, which essentially boils down to the idea that meat can and should be used as an ingredient, or a garnish, in a dish rather than as the main event. I love meat and can’t see myself going the vegetarian route, so the ideas and recipes in Bittman’s book struck a chord with me.

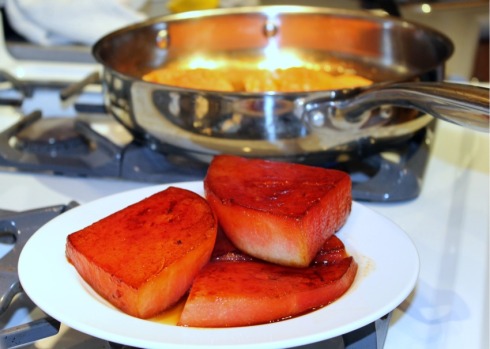
Of course, I also have a bad habit of buying cookbooks, flipping through them, and then promptly putting them away in my kitchen and forgetting about them for an extended period. This one suffered such a fate until I pulled it out this weekend for a look and something caught my eye that I’d never tasted, and frankly didn’t even realize was possible—seared watermelon.

In Mark Bittman’s recipe, the seared watermelon was used as a base for a Japanese-inspired fish dish. He wrote that the watermelon took on a substantial steak-like texture when it was seared, as the water was pulled out of it. I knew I needed to try this, but in my mind, I saw the watermelon paired with salmon (rather than the simple white fish Bittman recommends) and topped with a simple, fresh mint and basil chimichurri, since the flavours of watermelon and mint go so great together.

Jenny and I both agreed that this really turned out amazing. In addition to becoming less watery and firmer when seared, the sugars in the watermelon also caramelize in the pan, which adds a bit of a burnt sugar element. And while this looks like an elaborate, composed dish on the plate, it came together in no time at all—perfect for a weeknight.

pan seared watermelon

Pan-seared watermelon with salmon and mint-basil chimichurri

For the chimichurri:

1 C basil leaves, packed
¼ C mint leaves, packed
¼ C olive oil (good oil, like a Spanish – oil will be part of flavour so it should be good quality)
Zest and juice of half a lemon
A couple grinds of salt and pepper

Place all ingredients and half the olive oil in a food processor. Pulse for a minute or two until leaves get chopped and ingredients are well blended. Add more olive oil as needed, depending on desired consistency (less oil for a thicker chimichurri, more for a thinner one).

For the pan-seared watermelon:

Slice watermelon an inch or two thick and remove the rind. Season slices with a pinch of salt. Heat a metal pan coated with a small amount of olive oil over medium-high heat for several minutes. When oil begins to sizzle, place watermelon slices in pan. Leave to sear for two minutes or so, until it begins to brown, then flip and cook another two minutes on the other side. Remove from heat and set aside on a plate.

For the salmon:

Season individually portioned salmon fillets with salt and pepper. Sear on both sides in a hot pan until cooked, a few minutes per side.

To plate, place a slice of seared watermelon on a plate, top with a salmon fillet, then drizzle chimichurri overtop the salmon.

seared watermelon salmon chimichurri

Supporting Summer’s Bounty, and Those Who Grow It

10 Jul

pork chops summer dinner

It’s certainly taken a while to settle in, but we can finally say for certain that summer is here to stay for a while. Sunny skies and hot temperatures are an almost daily fact of life, and summer hours have kicked in for both Jenny and I at work, which means we (sometimes) get to leave the office early on Fridays to enjoy the season.

But the main reason I know summer is in full bloom is that farmer’s markets are teeming with amazing, fresh produce. I’ve written several times about the fact that one of the things I love most about living in southern Ontario is that we’re only an hour or so away from countless farms that produce a mind-blowing selection of fruits, vegetables, fresh meats and dairy. And in Toronto, we take advantage of this by hosting farmer’s markets in all corners of the city. One of our favorites is the Evergreen Brickworks Farmer’s Market, an oasis of farm freshness set in a lush landscape right in the middle of the city. Walking around farmer’s markets like this on a Saturday morning, looking at and smelling produce often picked just that morning and interacting with the people that actually grew what you’re considering buying really makes you appreciate the fertile land we’re surrounded by and the people who work it.

(As a bit of an aside, some of that land is currently being threatened in southern Ontario. A U.S. company called Highland Companies is currently planning to develop a quarry on farmland in Melancthon, Ont., home of some of the best soil in Canada. If the project is allowed to proceed, a key source of both food and water for residents of Ontario and Canada will be lost. Read more about the project here, and then sign this petition to voice your opposition to the Melancthon quarry.)

On a recent visit, I picked up some garlic scapes, oyster mushrooms and a spicy salad mix, which factored into a simple, flavourful summer meal of grilled pork chops (picked up from The Friendly Butcher on the Danforth) and a salad of sautéed mushrooms and garlic scapes. Here’s how I did it:

Grilled Pork Chops with Balsamic Cherries and Oyster Mushroom Salad

For the pork chops:

I rubbed the pork chops with some rub that Chef Roger Mooking was handing out to patrons at the recent Toronto Taste event; I’m not sure what was in the rub, but it smelled amazing and tasted great on the chops.

pork chops rub

I like grilling pork chops similar to steak, so that they’re cooked just past medium and retain just a little pink in the middle and are juicy. To do this, cook the chops on a BBQ over high heat. Place the chops on the grill and cook with the lid closed for about two minutes. Then turn the chops 45 degrees and cook for another two or three minutes. Then, flip the chops over and cook with the lid closed again for two minutes. Rotate 45 degrees again and cook for another couple of minutes. Remove the chops from the grill and let rest for five to 10 minutes.

For the salad:

Chop oyster mushrooms and garlic scapes into smallish pieces. Throw into a pan with some olive oil, salt and pepper over medium-high heat, sautéing for several minutes until everything starts to soften. Add a couple splashes of balsamic vinegar about half way through cooking. Plate mushrooms and scapes on salad mix and top with a generous splash of good olive oil.

oyster mushrooms and garlic scapes

For the balsamic cherries:

Jenny had picked up a jar of Composta di Amarene all’Aceto Balsamico (sour cherry compote with balsamic) from Eataly in New York City recently. It’s a jarred condiment imported from Italy that’s basically whole cherries preserved in balsamic vinegar. I threw a couple of spoonfuls in a heated pan with some more balsamic vinegar and chilli flakes, and let it simmer away for several minutes until it began to get jam-like and the vinegar reduced. Then I simply spooned this over the pork chops.

If you don’t have preserved cherries from Italy, I’m sure you could easily create a similar condiment with some pitted cherries cooked down in a pan with some balsamic and chilli flakes.

Enjoy summer!

pork chops plate

Panko and Wasabi-crusted Salmon with Ponzu Soy Reduction

5 Jul

Panko salmon ponzu reduction

Salmon has a pretty regular place on our dinner table. It’s good for us, the flavour of the fish pairs well with a lot of other ingredients, and it holds up well to a variety of cooking styles (not to mention that it’s pretty forgiving if you accidentally cook it too long!) 

Of course, as with anything else, the more we eat salmon, the more we look for new and different ways to prepare it. A few nights ago, the salmon filets in our fridge and my craving for sushi-like flavours conspired to lead me toward creating something new, while still being quick and easy.

By combining a layer of wasabi paste with a crunchy panko crust, and serving the salmon with a ponzu soy reduction, I managed to fairly successfully duplicate the taste of a maki roll, while cutting out most of the carbs of a sushi dinner. Jenny decided to make a simple salad of thinly sliced fennel and orange segments, tossed with the juice of half an orange, a little olive oil and some vinegar, which was light, summery and complemented the main dish nicely.

Panko salmon

Wasabi and Panko-Crusted Salmon with Ponzu Soy Reduction

For the salmon:

Rub one side of skinless salmon filets with a thin layer of wasabi paste.

Coat the wasabi-rubbed side with a generous amount of panko bread crumbs, pressing the panko gently into the salmon to ensure it sticks well. 

Coat a pan with a thin layer of olive oil, and heat over medium-high heat for several minutes. When pan is hot, place salmon filets panko side down, and cook about four minutes, until panko starts to brown and develop a nice crust. Flip over and cook another three or four minutes.

For the reduction:

Add 1/3 cup of ponzu soy sauce, 1/3 cup of fresh lemon juice, 1/3 cup of gin and the zest of half a lemon to a small sauce pot over medium-high heat. Allow liquid to come to a gentle boil, then turn heat down to low and simmer, stirring occasionally for 15 minutes or until the amount of liquid has reduced by at least a third. (Resist the urge to walk away – keep watching and stirring regularly, in case the liquid starts to boil again and you’re left with a sticky, useless mess).

Plate the salmon and top with a drizzle of the ponzu soy reduction. Serve alongside the fennel-orange salad.

Carbonara, Real and Re-imagined

22 Jun

Carbonara smoked bacon garlic scapes

Growing up with an Italian background, I’ve developed a passion for the great food my relatives introduced me to throughout my childhood. Generally though, I’m not one who believes that there are rules around Italian food that must be followed at all times… with three exceptions: bruschetta is pronounced “bru-sketta,” sugar doesn’t belong in tomato sauce, and spaghetti carbonara contains no cream. Ever.

While the name carbonara is derived from the Italian for “charcoal burner,” the dish’s origins are a bit murkier. One take is that it was called carbonara simply because the pepper resembled tiny flecks of coal. Another story says carbonara was created by coal miners as a quick meal that was easily prepared at job sites. I personally like this story best – because really, what self-respecting Italian preparing for a long stretch away from home wouldn’t pack some dried pasta and cured pork products?

The beauty of carbonara lies in its simplicity. Ultimately, it’s just pasta, pancetta, eggs and pepper. Beyond that, variations are hotly debated among carbonara purists. Some insist that only spaghetti be used, while others (myself included) say any noodle is fine. Some add onions, some garlic, and others use both. While pancetta is most common, some use guanciale instead. The thing everyone seems to agree on is that if it contains cream (relatively common in restaurants), it’s not carbonara.

I usually stick to the basics when I make my carbonara, while adding onions most of the time for a bit of extra flavour. Of course, I also don’t get to make it for dinner very often – its simplicity means carbonara lacks the protein, vegetables and nutrients that Jenny hopes for in a pasta dish. So as much as I get worked up about “real” carbonara, I’m usually trying to find ways to jazz it up and add a bit of nutritional value so my wife will let me make it. Once in a while I’ll add shrimp, or throw in something green and leafy.

eggs smoked bacon garlic scapes

My carbonara craving last night happened to coincide with a visit to the Brickworks Farmers Market this past weekend, which led me to create a version of the dish that – while still abiding by my central rule of no cream – threw out pretty much every other basic tenet of carbonara creation. I’d picked up some great smoked bacon from a vendor at the market, so in that went in place of pancetta. I also picked up some garlic scapes, which I thought would provide a compromise solution between onions or garlic. And I also added some frozen spinach and served the sauce on spelt noodles in order to add some nutrients and fibre. Whether or not the resulting dish was “true” carbonara is perhaps a matter of debate, but it tasted great and satisfied my craving nicely.

bacon garlic scapes chopped egg

Smoked Bacon and Garlic Scape Carbonara

Smoked bacon (enough to make the dish as bacon-y as your little heart desires)
2 garlic scapes
2 eggs
Spinach (ideally a large handful of fresh, though I used frozen spinach, thawed and drained, because it’s what I had on hand)
A cup or so of freshly grated parmigiano and/or pecorino-romano cheese

In a bowl, whisk together eggs, grated cheese and several turns of fresh ground pepper. Set aside.

Dice bacon into small cubes, and dice garlic scapes.

Prepare pasta according to package directions. While pasta is boiling, heat a tablespoon or so of olive oil in a pan over medium-high heat, and sautee bacon and garlic scapes until both become translucent. Then, turn off the heat.

Before draining pasta, reserve a half cup of the cooking water. Temper the eggs by slowly pouring a few teaspoons of this water into the bowl with your beaten eggs, whisking quickly as you do.

The next couple of steps require some quick work in order to retain the heat in the pasta, which will be used to “cook” the egg:

Toss drained pasta in the pan with the bacon and garlic scapes. Transfer to a large serving bowl, then slowly pour in egg/cheese mixture, tossing the pasta to coat as you pour. The goal is to have the egg sauce heated by the pasta, but to not get so hot that it curdles like scrambled eggs.

Serve in bowls, topped with more grated cheese and fresh ground pepper.

Memorable Quickies

15 May

Life has conspired yet again over the past couple of weeks to keep us busy on things unrelated to food and blogging, which is turning Communal Table into a sad little corner of neglect in the awesomeness of the World Wide Web. When Jenny and I get sidetracked with work and other duties of life, we don’t spend nearly as much time as we’d like experimenting in the kitchen. Instead, we resort to eating out a bit too often, or cooking the quick, simple standby meals that we’ve already blogged about.

In an effort to give the blog a little love even as our kitchen gets ignored, I thought I’d put up a quick post looking back at some of those easy meals we’ve previously written about here, and which we make often when we’re pressed for time. The idea for this post came from a conversation I had recently with my friend Sofi, who writes the great Sexy Typewriter blog. Sofi and I were commiserating about our lack of time for cooking, and she mentioned that she’d love to read a post where we highlight a few quick recipes she can try out.

The three picks here are my top choices from our recipe repertoire for meals I like to make when I only have a small amount of time and energy available for cooking. While I’m not going to claim that these recipes can be prepared in 20 or 30 minutes, it’s a pretty safe bet they can be completed in under an hour.

Eggs Poached in Tomato Sauce

As Jenny mentioned when she wrote this post, this is a quick, comforting meal I’ve been eating for years, and it’s one we turn to often when we just want to put something on the stove to cook that we don’t necessarily need to devote all our attention to. The ingredients are simple, and so are the flavours. But it’s delicious, healthy and suitable for even the busiest weeknights. It’s also a great choice for those evenings when you don’t want to eat meat.

Smoked Salmon on Dilled Potatoes

This one is basically a take on a Jamie Oliver recipe, who usually finds ways to take a few ingredients and quickly whip up something great with them. It’s definitely a lazy-day meal, but the flavours go so well together and the smoked salmon and herbs really stand out against the potatoes. There’s something very summer about this meal, and it’s one I’m sure we’ll turn to often over the next couple of months.

Seared Sirloin with Grapes and Port

This one just sort of came to me one day a couple years ago in a moment of creativity and inspiration. It’s delicious and perfect for our occasional red meat cravings. But the best part is how easy this dish comes together. Sear the meat. Saute shallots and grapes for a few minutes. Add port to pan and reduce to make a sauce. Serve over meat. That’s it.

Pan-seared Halibut with Salsa Verde

24 Apr

halibut with salsa verde

Since we moved to the Danforth East area of Toronto in 2009, I’ve lamented the lack of great places to buy meat and fresh fish. It’s not that there are no butchers or fishmongers in the east end, but they’re few and far between compared to the west end of the city. And you certainly can’t walk into a supermarket on this side of Toronto and buy all your groceries while also having access to an amazing selection of local, organic meats, like you can at Fiesta Farms (a place we love, but which is at the polar opposite end of Toronto from us).

Fortunately, the recent addition of a fishmonger called Hooked on Queen St. E in Leslieville has greatly improved our access to high quality fish and seafood. We’re definitely planning to make this our go-to place for great fish, and we’ll probably do a more in-depth post at some point on the place, its great staff and their focus on sustainable product. In the meantime, definitely check out some of the profiles that others have done.

But back to our first Hooked visit and purchase. I went in one day after work recently looking for a nice, firm-fleshed white fish to go with a salsa verde I was planning to make. A chat with knowledgeable owner Dan Donovan and a quick scan of their selection convinced me that a line-caught B.C. halibut filet was the way to go. The large fish was displayed whole at Hooked, and I liked the fact that they cut it as filets rather than the halibut steaks that seem to be more common, which I find are harder to cook evenly and contain too many pesky bones.

Hooked Toronto B.C. Halibut

Salsa verde, a.k.a. green sauce, is an herb-based sauce common to many countries. The version I made to go with our fish was closest to the Italian recipe, combining the herbs with anchovy, capers and vinegar (traditional Italian salsa verde recipes also contain garlic, which I left out because I didn’t want it overpowering the taste of the fish). I was initially a bit disappointed with the way the sauce tasted on its own, as it was a touch too tart and I’d probably leave out the Dijon mustard next time to cut down on the tartness and bring out the fresh herbs a bit more. But it ended up pairing perfectly with the moist and slightly sweet tasting halibut, which Jenny and I agreed was probably the best-tasting piece of fish we’ve ever cooked at home.

Pan-seared Halibut with Salsa Verde

2 halibut filet portions
12 capers
2 tsp Dijon mustard
1 tsp anchovy paste
2 TBS red wine vinegar
1/4 C high-quality olive oil
1 large handful of fresh parsley
1 large handful of fresh basil
1 large handful of fresh tarragon
A few mint leaves
Salt and pepper

For the salsa verde:
Chop all herbs and add to food processor along with half the olive oil and all other ingredients. Run the food processor to combine and blend everything, adding more of the olive oil gradually to get the sauce to reach the consistency you want – more oil for a thinner sauce, less for a thicker version. I added the entire 1/4 cup and still ended up with a relatively thick sauce that sat nicely on top of the fish.

For the fish:
Rub a small amount of olive oil on the bottom of a pan, and heat pan over medium-high heat for a few minutes to get it nice and hot. Season fish with salt and pepper and place in hot pan. Cook about four minutes, then flip and cook another three minutes (watch your timing here; it’s way better to slightly undercook good fish than overcook it).

Plate seared halibut filets and top each with a generous serving of salsa verde. Serve with a simple, fresh salad.