Tag Archives: BBQ

Finding My Burger Personality with Canadian Beef

9 Aug

Canada Beef Burger Personality

What’s your burger personality? It sounds like a bit of a strange question, until you take a look at the chart above, from Canada Beef. It’s part of their new campaign to get Canadians thinking about one of everyone’s favorite summer BBQ meals, and what makes an ultimate burger. And since I’m a Canada Beef Brand Ambassador (as I mentioned a while ago), I’m helping to spread the word. You can check out a full description of all the personality definitions here, and get a badge to post on your site to let everyone know what your ideal burger type is.

After many years of trial and error, I’ve discovered that I’m a Naturalist when it comes to burgers. I’m not saying that I don’t enjoy fancy, kicked-up burgers. My mom makes amazing chipotle burgers, and there’s a burger joint in Toronto that tops one of their burgers with foie gras and bacon. I haven’t tried it yet, but I definitely have to soon!

But of all the burgers I’ve made in my own kitchen or on my BBQ, the ones I made a couple weeks ago stand out to me as a revelation. I started with ground beef from Rowe Farms, an Ontario farming co-operative known for their quality product. To that meat I added… nothing. Well, almost nothing. A few dashes of Worcestershire sauce for a hit of that flavour that only Worcestershire can give you, a few grinds of black pepper and a pinch of smoked paprika for some heat and smoke flavour that would only enhance how the burgers would taste on the BBQ.

I also abided closely to two rules that I’d heard many times before about burger-making, but tend to ignore when I’m in a rush to cook. I only mixed the meat enough to blend in the ingredients, and when forming the burgers, I made sure to form them loosely. The more you handle the meat, the tougher it can be when it’s cooked. And densely formed patties don’t cook as well or release juices as nicely as loose ones.

Finally – and maybe most importantly, salt the outside of the patties generously just before putting them on the grill or in the pan. The reason for adding the salt at this stage is, again, to keep the moisture in the meat, making the resulting cooked burgers tender and juicy. Salt is important to creating a great, flavorful  burger. But if you add the salt to the meat before you form the patties, and it’s allowed to season the meat for an extended period of time before cooking, you’ll end up with dense, tightly packed patties – closer to the texture of sausage than a hamburger.

If you’re looking for great burgers made the Naturalist way, it’s as simple as that. So now… what’s your burger personality?

Smoked Potato Towers with Chorizo and Arugula Pesto

16 Jun

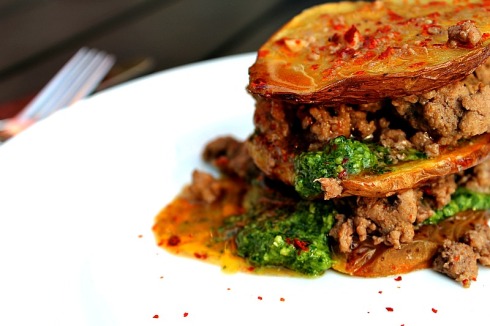
Smoked potato tower chorizo pesto

Here’s a little piece of info I’m not sure I’ve shared before with readers of Communal Table. A long time ago (about 10 years or so), in a land far, far away (Winnipeg, Manitoba), I was hired in my first job as a trade magazine editor. The task: create Canada’s first magazine devoted entirely to the potato. As a twenty-something from Toronto who’d never set foot on a farm, let alone pulled a potato from the earth, I immediately thought two things: one, the magazine was destined to be a spectacular failure; and two, my career in magazine publishing was going to be brief and disasterous.

A decade later, I can happily report that I’m still working in magazines. And, my colleagues and I managed to create a successful magazine (which is still publishing today, long after my reign ended). As dumbfounded as I was by the idea that some city kid should be running a magazine devoted to Canada’s most important produce crop, I really enjoyed the time I spent learning about all aspects of potato growing, production and marketing. So when Jenny and I were invited to participate in a food blogger competition, sponsored by Ontario’s own EarthFresh, to create a recipe using the company’s Klondike Rose potatoes for its Foodies for Klondike Rose Contest, I jumped at the chance to shine a spotlight on potatoes once again.

After brainstorming a few recipe ideas, my mind drifted to a barbecue we’d been at a couple weeks earlier, where a friend made smoked pulled pork. While I’ve smoked meats and fish a couple times, I’d never tried to smoke a potato. And since Jenny and I are always up for a new culinary challenge, the idea behind this recipe for smoked potato towers with chorizo and arugula pesto took shape from there.

Potatoes wood chips smoker box

This recipe is essentially a three-part process. While it’s time-consuming to prepare the homemade chorizo (which I did Mexican style, in that there’s no sausage casing, but using more Spanish flavours), make the arugula pesto and smoke the potatoes, none of the steps are difficult. This is a definite weekend dish, something to share with friends or family while sitting on a patio and enjoying summer.

Smoked potatoes on pan

Smoked Potato Towers with Chorizo and Arugula Pesto (Serves 4)

For the arugula pesto:
1/3 C grated Pecorino Romano cheese
2 large handfuls arugula, chopped
1 handful parsley, chopped
1 handful of pine nuts, lightly toasted in a dry pan
1/4 C good olive oil, preferably Spanish
A pinch of salt

Add all ingredients into a food processor. Blend until  well combined, adding a few more drizzles of olive oil as you go to get the right consistency (you want it fairly thick, but more of a puree than a paste).

For the chorizo:
1 lb ground pork
1 large garlic clove, finely diced
2 tsp smoked paprika
1 tsp cumin
½ tsp fennel pollen or crushed fennel seeds
1/2 tsp cayenne
3/4 tsp ground black pepper
3/4 tsp salt
1/4 cup water

Mix all spices in a small bowl, and stir in water to make a thin paste. Place ground pork in a larger bowl. Add spice paste and diced garlic and use your hands to combine all ingredients. Cover and refrigerate at least 3 hours, but preferably overnight, to allow flavours to come together.

For the smoked potatoes:

Cut potatoes lengthwise into slices roughly half an inch thick. Use one or two potatoes per person – you should be able to get roughly four oval-shaped slices from each potato.

Coat potato slices in olive oil and a sprinkle of salt. Lay slices on a barbecue-safe pan that will fit across the middle of your grill.

Set up your grill to smoke over indirect heat. (I have a gas grill, so that’s the type of BBQ I know how to smoke on. If you’ve never smoked on a gas grill, here’s a good how-to video). Once your chips have started to smoke, place your pan of potato slices on your middle grate. Close the lid and let the potatoes cook at about 250 degrees F for 30 to 40 minutes. Resist the temptation to lift the lid during the cooking process, since doing so releases smoke needed to flavour the potatoes. Do check the potatoes at the 30-minute mark to see if they’re cooked through. If not, let them cook another five or 10 minutes until they’re finished – the slices should have a nice brown crust on the outside without being burnt, and the inside should be cooked but still fairly firm. Remove potatoes from the BBQ.

While potatoes are smoking, brown the chorizo in a pan over medium heat. Add 1/2 C of red wine. Lower heat and let chorizo simmer for 10 minutes or so, until some of the wine has been absorbed.

To assemble, place one smoked potato slice on a plate. Spread a spoonful of pesto across the slice, and top with a spoonful of chorizo. Top with another potato, spread with another spoonful of pesto, then add another spoonful of chorizo. Top with another smoked potato slice, and sprinkle a pinch of smoked paprika over top to garnish.

Serve as an appetizer, or enjoy as a main with salad and grilled vegetables.

Smoked potato tower with chorizo and arugula pesto

Homemade Chicken Burgers – A Kickoff to Summer!

30 May

Summer’s here, and it seemed to come on fast. I was just getting used to the no socks with shoes thing when full-on sandals and bare legs weather came out of nowhere.

But I say bring it on.

I love this time of year and I find it inspires me to dream up seasonally appropriate meals meant to be eaten outdoors.

The other night I had a craving for chicken burgers, and we initially went hunting for good quality pre-made ones at a local butcher shop. But when we couldn’t find any, I decided to make them from scratch and I’m so happy I did. It was way less of a big deal than I originally imagined, and it was worth it once we sat down to dig into these juicy and flavorful burgers.

It was Neil’s idea to buy ground chicken breasts and ground chicken thighs. I think that’s what ensured the chicken burgers were so tender and juicy and not dry. 

I’ll admit I’m a bit of a nut when it comes to kitchen safety and bacteria where chicken is concerned. I often avoid cooking it altogether because I’m that paranoid about salmonella poisoning (Yes, there was a traumatic experience in my past that made me this way).

But luckily, with chicken burgers you pretty much only need to use one bowl and one platter to hold the patties once they’re formed. I’m not going to lie though, I did throw on a pair of latex gloves to mix the meat by hand and form the patties. It actually worked beautifully! (If this makes me a freak, at least I’m a cautious freak.)

These chicken burgers are simple enough in flavor that they won’t fight with any toppings, but flavorful enough that you don’t need to heap the toppings on if you don’t want to.

We ate ours with guacamole & spicy greens on one night and with Peri-Peri hot sauce & sweet/spicy preserved shallots on another. They’re pretty versatile and would probably go well with anything you dream up to top them with.

Happy summer!

Communal Table’s Chicken Burgers

1 package ground chicken breasts

1 package ground chicken thighs

2 large shallots, diced

Handful of cilantro, chopped

Garlic powder

Onion powder

Ground cumin

Ground coriander

Sea salt and fresh ground pepper

**All spices to taste (eyeball it!)

Mix all the ingredients really well in a bowl and form into patties. If you’re a paranoid bacteria-phobe like I am, use gloves for this step but either way, make sure you wash your hands well and be careful about cross contamination.

Barbeque the burgers for approximately 6-7 minutes per side on medium-high heat.

Serve on a delicious bun along with your favorite toppings and eat outdoors – it’s summer!  

The Cuban Sandwich: Re-invented for Food Day

31 Jul

To celebrate Food Day Canada, Neil and I came up with an idea inspired by a fond food memory and fresh local produce, resulting in a new take on a classic sandwich; The Cubano.

There seems to be some debate about where the sandwich was born. Some say it was created in Cuban cafes, some say it evolved to what it is today in nearby Florida as Cubans eventually settled there. Either way, today you can find different variations depending on where you go, but the basic components seem to always be the same: bread, Swiss cheese, roasted pork, ham, mustard and pickles. Usually grilled or pressed, always delicious. The pickles really bring it home for me, but all of those basic ingredients oozing and hot between good bread really can’t be beat.

The first time Neil and I experienced a Cuban sandwich was in the back seat of a New York City cab. We found ourselves in a huge rush to get across the city, but we were also starved so we ran into the first takeout place we could find; The Original Sandwich Shoppe of NY on Greenwich Ave. in the West Village. We read the menu quickly and chose the Cuban mostly by default, agreeing that it sounded interesting but not really paying much attention.  There was little expectation or anticipation. We grabbed it to go and hopped in the cab not realizing we were missing a key ingredient – napkins, much needed when tackling a really good Cuban sandwich. How naïve we were before taking that first messy bite. We were completely unprepared for the sheer sandwich nirvana that followed. But we never forgot it. I usually seek one out now when I’m in New York and you can find them at just about every corner deli. Sometimes the pork is roasted and shredded, sometimes it’s in bigger chunks, but those main ingredients are always there and they pair so perfectly together.

We were bouncing around some ideas for dinner on Food Day, when I found myself thinking about those ingredients and how well the flavors work together. But we wanted to do something a little bit different and decided we’d take our cues from what we found on our travels that afternoon.

At Rowe Farms we found beautiful Ontario heirloom beets and green beans and thought it would be fun to play with the pickled part of the sandwich. We also picked up some of their boneless pork loin chops, which we thought would also be a nice update considering it’s BBQ season and chops grill so nicely and quickly on the BBQ. Across the street at the Leslieville Cheese Market we got two different kinds of mild and creamy Canadian cheese and a loaf of good fresh sourdough bread.

Back at home our vision evolved and we decided we’d create a bit of visual feast for ourselves, laying out all of our ingredients to make our own open-faced Cubans with a few twists. We ditched the ham altogether and figured heating the bread on the BBQ would give enough of that grilled flavor in place of dragging out the Panini press.

I quick-pickled the beets and beans in separate batches with slight variations in the pickling liquid. Neil made his own version of a mojo marinade for the pork after reading that the slow-roasted pork usually found on classic Cubanos is marinated in this unique and delicious blend of citrus and spices.

After leaving the pork to marinate and the veggies to pickle for a few hours, all we had to do was light the BBQ, grill the chops and bread and help ourselves to what turned out to be a really fun and delicious take on a sandwich that we both love. Of course we didn’t forget the real pickles (we used mini kosher dills) and grainy mustard. 

We couldn’t completely stray from tradition, though our modern additions made for one enjoyable backyard meal that we’ll definitely be making again. A slight step up from the back of a cab, but just as fun and memorable.


* Quick-Pickle Disclaimer: We barely followed a recipe for the pickled vegetables. We just threw a bunch of stuff into a pot and hoped for the best. Though we did decide to use more sugar for the beets to offset their slight bitterness and changed up a few of the ingredients for the beans. I tried to give measurements, but give or take for each… use your judgment! You can’t really screw them up by adding a little more or less of these ingredients.

Quick-Pickled Raw Beets

Small bunch of fresh beets

1 cup white vinegar

¼ cup sugar

Handful of black peppercorns

Small handful mustard seed

A few bay leaves

Clean and peel the beets. Slice them thinly into rounds and put them in a bowl or container.

Bring the rest of the ingredients to a boil in a small saucepan. Once boiled, remove from heat and pour over the raw beets. Cover and leave them to sit in the pickling liquid for a few hours or in the fridge overnight. We let ours pickle for about two hours and they were delicious.

Quick-Pickled Green Beans

A bunch of fresh green beans, washed & trimmed

1 cup vinegar

A little less than ¼ cup sugar

6-7 grinds of sea salt

Handful of mustard seed

A pinch of ground ginger

A few bay leaves

Lightly steam the green beans so they’re heated and slightly cooked but still crunchy.

Bring all of the pickling ingredients to a boil in a small saucepan. Once boiled, remove from heat and pour over the green beans. Cover and let them sit in the pickling liquid for about 2 hours or overnight in the fridge.

Mojo-Marinated Grilled Pork Chops

3-4 small boneless pork loin chops

Juice of 1 orange

Juice of 2 fresh limes

3 garlic cloves, minced

1 tsp paprika

2 tsp cumin

1/3 cup olive oil

A few pinches of sea salt and black pepper

Mix all of the ingredients for the marinade and pour on top of the pork chops. Cover, refrigerate and let marinate for at least 2 hours or overnight. We left ours for about 2 hours and they were very flavorful but next time we’d like to try leaving them overnight to let the flavors penetrate the pork even more.

Heat your BBQ to approximately 450 degrees. Cook the pork chops for about 4 minutes per side.

To Assemble Open-Faced Cuban Sandwiches:

While the BBQ is hot, grill slices of fresh bread brushed with a little bit of olive oil. Slice the pork into strips and lay them out on a platter. Slice pickles and arrange pickles, beets and beans on a tray or wooden board with any kind of semi-soft, creamy cheese and Dijon or grainy mustard.

Take a slice of grilled bread, spread with mustard and top with cheese, pork and your variety of pickles. Keep a stash of napkins closeby… 

Supporting Summer’s Bounty, and Those Who Grow It

10 Jul

pork chops summer dinner

It’s certainly taken a while to settle in, but we can finally say for certain that summer is here to stay for a while. Sunny skies and hot temperatures are an almost daily fact of life, and summer hours have kicked in for both Jenny and I at work, which means we (sometimes) get to leave the office early on Fridays to enjoy the season.

But the main reason I know summer is in full bloom is that farmer’s markets are teeming with amazing, fresh produce. I’ve written several times about the fact that one of the things I love most about living in southern Ontario is that we’re only an hour or so away from countless farms that produce a mind-blowing selection of fruits, vegetables, fresh meats and dairy. And in Toronto, we take advantage of this by hosting farmer’s markets in all corners of the city. One of our favorites is the Evergreen Brickworks Farmer’s Market, an oasis of farm freshness set in a lush landscape right in the middle of the city. Walking around farmer’s markets like this on a Saturday morning, looking at and smelling produce often picked just that morning and interacting with the people that actually grew what you’re considering buying really makes you appreciate the fertile land we’re surrounded by and the people who work it.

(As a bit of an aside, some of that land is currently being threatened in southern Ontario. A U.S. company called Highland Companies is currently planning to develop a quarry on farmland in Melancthon, Ont., home of some of the best soil in Canada. If the project is allowed to proceed, a key source of both food and water for residents of Ontario and Canada will be lost. Read more about the project here, and then sign this petition to voice your opposition to the Melancthon quarry.)

On a recent visit, I picked up some garlic scapes, oyster mushrooms and a spicy salad mix, which factored into a simple, flavourful summer meal of grilled pork chops (picked up from The Friendly Butcher on the Danforth) and a salad of sautéed mushrooms and garlic scapes. Here’s how I did it:

Grilled Pork Chops with Balsamic Cherries and Oyster Mushroom Salad

For the pork chops:

I rubbed the pork chops with some rub that Chef Roger Mooking was handing out to patrons at the recent Toronto Taste event; I’m not sure what was in the rub, but it smelled amazing and tasted great on the chops.

pork chops rub

I like grilling pork chops similar to steak, so that they’re cooked just past medium and retain just a little pink in the middle and are juicy. To do this, cook the chops on a BBQ over high heat. Place the chops on the grill and cook with the lid closed for about two minutes. Then turn the chops 45 degrees and cook for another two or three minutes. Then, flip the chops over and cook with the lid closed again for two minutes. Rotate 45 degrees again and cook for another couple of minutes. Remove the chops from the grill and let rest for five to 10 minutes.

For the salad:

Chop oyster mushrooms and garlic scapes into smallish pieces. Throw into a pan with some olive oil, salt and pepper over medium-high heat, sautéing for several minutes until everything starts to soften. Add a couple splashes of balsamic vinegar about half way through cooking. Plate mushrooms and scapes on salad mix and top with a generous splash of good olive oil.

oyster mushrooms and garlic scapes

For the balsamic cherries:

Jenny had picked up a jar of Composta di Amarene all’Aceto Balsamico (sour cherry compote with balsamic) from Eataly in New York City recently. It’s a jarred condiment imported from Italy that’s basically whole cherries preserved in balsamic vinegar. I threw a couple of spoonfuls in a heated pan with some more balsamic vinegar and chilli flakes, and let it simmer away for several minutes until it began to get jam-like and the vinegar reduced. Then I simply spooned this over the pork chops.

If you don’t have preserved cherries from Italy, I’m sure you could easily create a similar condiment with some pitted cherries cooked down in a pan with some balsamic and chilli flakes.

Enjoy summer!

pork chops plate

Celebrate Food Day on Saturday

28 Jul

 Canada Maple LeafOne of the best things about being a food lover living in Canada – and one of the easiest things about blogging about food in Canada – is that there’s just so much great stuff to enjoy within our borders. The fresh fish and seafood, variety of produce, grains, meats and dairy we have is truly unbelievable. And with such easy access to all these great food products in communities across the country, it’s no wonder that Canadian chefs and home cooks alike are so innovative. But with all this around us, it’s easy to take it for granted.

Food Day, which is this Saturday, July 31, is aimed at making sure Canadians recognize our bounty. Food Day was started in 2003 by Canadian food writer and educator Anita Stewart, with an event – The World’s Longest BBQ – designed to help the country bounce back from the sanctions that were then in place on Canadian beef. The spirit of that first BBQ has carried through annual Food Day celebrations over the past eight years, with more and more people marking the day by holding their own backyard grill fests. Stories posted by Canadians to the Food Day website over the years demonstrate how people have embraced the celebration.

This year, Food Day is being expanded even further, as restaurants and food suppliers across the country are joining forces to offer special menus celebrating Canadian food. The Food Day website has a listing of the more than 130 restaurants participating across Canada, and some of the menus posted look incredible. Have a look and consider checking out a participating restaurant in your community if you don’t feel like firing up the grill at home.

I grew up surrounded by a tradition of, and passion for, great food. The Italian side of my family made me appreciate fresh ingredients and simple preparations, while my amateur gourmet chef mother taught me that food can be cooked and presented in so many incredible ways. But it was the five years I spent living in Manitoba in my 20s that really gave me an understanding of the complexity of food beyond what appears on my plate. As a trade magazine editor working in the Prairies, I spent those years covering agriculture issues. I had the chance to speak to farmers, manufacturers, food marketers and government officials about the challenges and triumphs associated with being part of the food chain. I was founding editor of Canadian Potato Business, a magazine aimed at providing important information to producers of Canada’s most important field crop. As much as that tends to be a point of amusement in conversations today, it was a great experience and opportunity to learn about issues my born-and-raised-in-the-Greater-Toronto-area mind hadn’t previously thought of. And the fact that the magazine continues to thrive today (albeit under a different name and written by people with better understanding of farm issues than me) makes me proud.

I won’t be in Toronto on Food Day to take advantage of the great menus from this city’s participating restaurants. But whether or not I’m eating at a Food Day partner resto on July 31, I’ll be sure to spare a thought to all the people who dedicate their lives to bringing us amazing food products.

How will you celebrate Food Day?

Vacation on a Plate: Grilled Pineapple with Tequila-Brown Sugar Glaze & Coconut Yogurt

25 Jul

A few weekends ago, Neil’s mother made us a dessert that I’ve been craving ever since. The flavors stuck with me and I knew I would have to make it for myself.

The original recipe for Grilled Pineapple with Tequila-Brown Sugar Glaze is from Bon Appétit circa 1997. My mother-in-law modified it slightly, soaking the pineapple in the heavenly liquid for a few hours and serving it with homemade margarita ice cream and toasted coconut ice cream; THAT was pure heaven in a bowl.

And I modified it tonight, soaking the pineapple overnight to really absorb the tequila goodness and serving it with coconut yogurt and some lime zest. The result was a dessert that made my whole family feel like we had checked out and taken a trip to the tropics. A little ‘vacation on a plate’, if you will.

The smell coming off the barbeque as the pineapple rounds cooked was amazing. My dad said it smelled like toasted marshmallows, as the warm, sugary, caramely- scent wafted through the air.

The coconut yogurt was a last minute addition when it caught my eye at Fiesta Farms. I hardly ever buy full-fat yogurt, but this was a treat that was well worth it. I bought Liberte brand and it was creamy and delicious with real pieces of coconut throughout.

Here’s my version of this sinfully good but fairly guilt-free dessert:

Grilled Pineapple with Tequila-Brown Sugar Glaze and Coconut Yogurt

Serves 6-7 people

3/4 cup tequila

3/4 cup packed brown sugar (I actually used Splenda’s brown sugar blend – a mix of real brown sugar and Splenda – so I used a little less than ¾ cup)

1 1/2 tsp vanilla extract

1/4 teaspoon ground cinnamon

1 large pineapple, peeled, cored, cut into thick rounds

1 pint of coconut yogurt

Zest of 1 lime

Stir the first 4 ingredients in a small bowl until sugar dissolves.

Marinate the pineapple in the mixture, cover and refrigerate. I let it sit overnight for about 24 hours, but you can marinate it for 2-3 hours and it should be just as good (though maybe not as ‘boozy’)

When you’re ready to grill, turn the BBQ to medium heat. Grill pineapple until brown, basting with tequila mixture and turning occasionally, about 5-10 min total.

Serve immediately with a dollop of yogurt and a sprinkle of lime zest.

Then, try to resist drinking the remaining marinade. Neil basically asked me for a straw. Luckily I distracted him and decided to save the remaining liquid in an air-tight container in the fridge. We may attempt some special drinks with it this week…

Last-Minute Meal: Salmon Burgers with ‘Faux Tartar Sauce’ & Romaine and Dill Salad

7 Jul

You know those nights when you’re pressed for time, your fridge is basically empty and the thought of cooking makes you want to cry? Tonight was one of those nights at our house. They seem to be plentiful lately.

But it’s quite the coup when you figure out how to overcome those shortcomings and still end up with something healthy and delicious. Hence this post! I wanted to share a little last-minute meal that was a combination of convenience and inspired innovation.

It all started when we remembered that we had a package of salmon burgers in the freezer. We usually don’t like to buy packaged burgers and prefer making our own, but who’s kidding who? That’s just not possible sometimes so it’s always nice to have some backup ready to go in the freezer. I bought PC brand Blue Menu ‘Wild Pacific Pink Salmon Burgers’ a while ago and was a bit skeptical about how they would turn out. I feared they would taste scarily reminiscent of cat food or at least like canned salmon (I know, why did I buy them in the first place?!), but I’m happy to report that they were surprisingly delicious and full of real chunks of salmon that tasted great. I highly recommend them and will definitely buy them again.

We needed a quick salad to go with the burgers and I decided to try my own version of a fantastic salad we recently had at an amazing new Greek takeout restaurant in the east end called Folia Grill.

Their food is so fresh and clean tasting – which to me is very impressive for a fast food Greek place. Nothing leaves you feeling greasy or heavy, the ingredients are fresh and you can tell it’s all been cooked and devised with a lot of thought and care. The owners bring in a special olive oil from Greece that you can really appreciate in their salads and on their grilled peppers. Honorable mention to the chicken gyro (the first I have ever eaten that hasn’t made me feel sick by the last bite; it’s non-greasy and full of smoky paprika flavor) and the pork souvlaki, which Neil absolutely adored.

But the pièce de resistance was Folia’s Romaine and Dill salad. So fresh and delicious, I had to try to make it at home. I’ll admit, mine wasn’t nearly as good as theirs – I don’t have the dressing quite right yet, but just the idea of this simple salad is so wonderful and such a great melding of flavors.

And then I needed a little sauce to go along with the burgers so I came up with my own healthier version of tartar sauce, completely inspired by what we had in our fridge. It came out pretty good, I have to say!

All of that paired with some grilled peppers and eggplant that I cut and tossed in olive oil and balsamic in about 5 minutes and then BBQ’d, and we ended up with a killer last-minute meal.

The whole thing took about 20 minutes to prepare and cook, leaving me with ample time to enjoy my prized backyard hammock, pictured below.

The hammock was my 30th birthday present last summer from my amazing husband, and it is pure bliss. My ‘happy place’, as I call it. There’s nothing like coming home after a stress-infused day (every day!) and surrendering yourself into the comforting embrace of a hammock.

If anyone out there is actually reading these blog posts (hello? Are you out there?), feel free to chime in and share your favorite last-minute meals or even an anecdote about your ‘happy place’ that keeps you sane and helps the stress of the day melt away…

In the meantime, some quickie recipes from tonight’s meal:

Dill and Romaine Salad:

Make sure you buy some really green and crisp romaine leaves, and cut them into thin strips. I rolled the leaves up like I usually do with basil and cut strips from there.

Chop up a ton of fresh dill (no measurements – it’s a quickie dinner!) and add it right into a bowl with the strips of romaine.

Drizzle with a good strong olive oil, some white wine vinegar, coarse sea salt and I drizzled on a bit of honey for sweetness. Mix and enjoy!

(side note: I rarely make a vinaigrette in its own bowl anymore… who has the time? I always drizzle my ingredients right onto the lettuce leaves and usually toss by hand. Yes, sometimes the proportions don’t work out perfectly, but sometimes good enough is good enough…)

Faux Tartar Sauce for burgers:

Mix in a bowl: low-fat sour cream, hot white horseradish, lemon juice, a bit of dijon mustard and 1 chopped dill pickle. Again, no proportions, just go with it!

This meal was enjoyed outdoors with a view of my aforementioned ‘happy place’…