Archive | Vegetarian RSS feed for this section

The Best Kale Salad with Sweet Sesame Dressing

14 Mar

Kale has become a hot & trendy little vegetable lately, which is fine by me because I love finding it on restaurant menus everywhere I go. But I’ve been a kale admirer for many years and it’ll continue to be my favorite leafy green even when its fifteen minutes of foodie fame are up.

I absolutely love this powerhouse vegetable. Every time I eat raw kale I feel amazing inside. It’s the only food that has an almost instant effect, making me feel like I’m doing my body good by eating it. And it tastes amazing! It’s so earthy and hearty and the flavor changes and intensifies based on what you do with it.

I love it roasted, steamed, sautéed, juiced, baked, and, of course, in ‘chip’ form, but the best way to eat kale is most definitely raw.

I sometimes like to just toss it with olive oil, sea salt, lemon and a touch of maple syrup; but this easy sesame dressing is one of my all-time favorites and it stands up to and pairs so nicely with the boldness of kale.

I make this sesame dressing often. When I feel like cleaning a slightly bigger mess, I use a blender to mix it, which gives a really nice, smooth and creamy consistency. But when I don’t have the patience, I just whisk it up in a small bowl and add the hot water in a little bit at a time while whisking to smooth it out.

The photos here show a dinner salad that I made last week with a mix of red and green kale, raw cauliflower and crunchy bean sprouts. Kale is a great green to eat as a meal because it’s so filling and full of goodness. And it holds up nicely as a weekday take-to-work lunch salad because it doesn’t really get soggy like other lettuces when it’s dressed. 

This dressing would also be amazing on sautéed or steamed spinach with some sesame seeds sprinkled on top.

Kale Salad with Sweet Sesame Dressing

Bunch of kale, washed & torn into bite sized pieces

¼ cup tahini

2 tbsp tamari soy

2 tbsp agave

Hot water, to taste (to thin out the dressing)

Sesame seeds – optional, for sprinkling

Use a blender or a small mixing bowl and whisk. Mix the tahini, tamari soy and agave until blended. Add in hot water a little bit at a time until you get a consistency that you like.

Toss kale with sesame dressing and sprinkle with sesame seeds. 

* I did find this general recipe online somewhere a few years ago but I can’t remember where it came from so I can’t source it properly. 

Eggs, Butternut Squash and Zucchini for Meatless Monday

12 Mar

poached egg braised zucchini butternut squash puree

As I mentioned in a recent post, I’ve been thinking a lot more lately about cooking interesting vegetable-based meals. When I cook, my default is usually to start with meat, because most meats are full of flavour and provide a good base around which to build a satisfying dish. But with the right amount of attention and care, vegetables can also star in some amazing meals.

Recently, Jenny and I had the chance to eat at Ursa, a new restaurant in Toronto that’s being talked about because of the kitchen’s focus on using innovative techniques – dehydration, compression, sous vide – to create big flavours while still retaining as much of the nutrients as possible in each ingredient. We split a selection of appetizers and mains in order to taste as much as possible. It was an amazing meal, but my favorite dish – and one of the best restaurant mains I’ve ever eaten – turned out to be little more than a plate of seasonal vegetables. In fact, the dish was simply called “Seasonal Vegetables” on the menu. But what that description didn’t convey was that the textures and tastes of the vegetables on the plate were surprisingly, mind-blowingly bold. The ingredients in the dish still tasted like the vegetables that they were, but each was treated with so much care that the finished product had as much flavour as any great meat dish. Here’s an iPhone shot of the dish, which doesn’t do it proper justice, as it was as beautiful to look at as it was amazing to eat:

Ursa Toronto restaurant

If my meat-free experience in January was an awakening, my vegetarian main at Ursa was a revelation. I’m never going to fully give up meat, but I’m determined to experiment more in my kitchen with the potential to build great recipes around vegetables – and that determination is where the idea for this recipe came from. By preparing different vegetables – in this case, butternut squash, zucchini, kale and tomatoes – using different cooking methods and flavourings, I hoped to create a composed vegetarian dish that was healthy and satisfying, with different tastes and textures on the same plate.

In the end, I think I achieved what I set out to do. Jenny – who loves all things vegetarian – talked about how much she liked the meal, and I really didn’t miss the lack of meat at all. I’m sure I’ll be making this again, and will continue to experiment with vegetables in my cooking.

Poached Egg on Butternut Squash Puree with Braised Zucchini

For the braised zucchini:

Preheat oven to 350 degrees

Cut two zucchinis lengthwise into spears

In a bowl, mix together 2 tablespoons of honey, half a teaspoon of cumin, the juice of 1/4 of an orange, and a grind each of pepper and salt

Place the zucchini spears in a small oven-proof dish and toss with the honey marinade

Bake for about 30 minutes, turning spears halfway through cooking time (the goal is to cook the zucchini until it’s slightly limp but not too soft)

For the butternut squash puree:

Empty 1 can of butternut squash puree into a saucepan over medium-low heat

Stir in half a teaspoon of fennel pollen, a grind of pepper and a pinch of salt

Stir in 2 tablespoons of ponzu soy sauce


Poach one egg per person. Place some of the butternut squash puree in the centre of a plate, top with a poached egg and four or five of the braised zucchini spears. Serve alongside a dark, leafy green salad – I made a simple salad of kale and cherry tomatoes tossed with a tahini dressing.

Mushroom & Kale Polenta Hash with Eggs

11 Mar

Image

I cherish my weekends. I try to savor every minute of the two glorious days where I can shed (most) responsibility & stress and just be. And savoring them over a delicious brunch is pretty much as good as it gets. 

But Neil and I have made a promise to eat out less and cook at home way more, and that means brunch falls in my hands. 

For some reason, despite being an amazing cook, Neil’s intimidated by breakfast. His creative ideas cease to flow pre-coffee, and just the thought of having to figure out what to eat seems to push him over the edge. Though I don’t mind because breakfast and brunch is definitely my domain. 

I love thinking of interesting breakfast creations, brewing up a pot of good coffee, turning on some weekend-appropriate music and getting to work in the kitchen. 

As much as I love meeting friends for brunch and having someone else cook for me in my down time, taking the time and care to make something beautiful myself and then sitting down with my husband at our own kitchen table to enjoy it, is a bit of weekend bliss. 

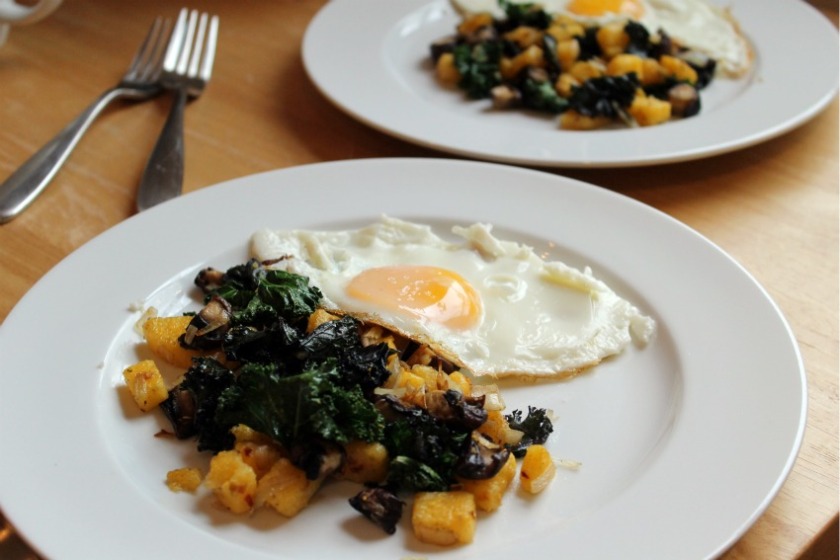
Here’s a quick and delicious brunch that I made yesterday, using what we had in our fridge. 

When I spotted the polenta and mushrooms, I imagined an earthy, savory hash to go with eggs. I cooked the eggs medium so that the yolks were still rich and runny but not too thin or liquid-ey when they broke. There’s something so satisfyingly perfect about breaking a rich egg yolk overtop of savory ingredients and taking a bite of everything together. 

With a cup of dark coffee, I think this brunch stands up to the best of them. 

Oh, and it took about 12 minutes to throw together. Way less than standing in a brunch lineup!

Mushroom & Kale Polenta Hash with Eggs 

1 log of Italian-style pre-cooked polenta

Bunch of kale (I used a mix of red and green)

Cremini mushrooms (I used 2 medium-sized ones for two people)

1 large shallot

Olive oil

Thyme-infused olive oil or fresh or dried thyme

Sea Salt

Pepper

Red chili flakes

Eggs

Image

Cut off a few rounds of the polenta (I used three) and then chop them into small cubes.

Chop the shallot and mushrooms into small pieces and tear the kale into small bite-sized pieces as well.

Heat a bit of olive oil in a pan over medium heat and sauté the shallot for a few minutes, seasoning with a bit of salt. Add in the kale and mushrooms and cook for a few more minutes before adding in the polenta cubes. Sautee everything together, season with pepper and a few chili flakes.

I drizzled just a little bit of Nudo’s thyme-infused olive oil into the hash, which added such a great earthy compliment to the mushrooms and kale. You could use some dried or fresh thyme instead, but only use a little bit so as not to overwhelm.

Cook on medium-low heat until the polenta cubes are a bit crispy on the outside.

Meanwhile, heat another pan and cook a few eggs sunny-side up. I cooked ours to medium so the yolk was still gloopy and runny, but not too liquid-ey.

Plate the polenta ‘hash’ and top with eggs.

Happy weekend!

Mushroom Ragout Instead of Meat

20 Jan

mushroom ragout bowl

At the start of January, I decided to give up meat for the rest of the month. I didn’t do it for health reasons, though there are several legitimate health-related arguments for cutting meat out of one’s diet. And I didn’t do it for any environmental reasons, though I do believe that anyone who eats meat should be concerned about how the animals they consume are raised, slaughtered and sold.

For me, it was a personal challenge more than anything. I love meat and I don’t think I’ve ever gone an entire week without eating it, so pledging to go meat-free for a month was going to be tough—and it has been. Truthfully, I haven’t completely eliminated animals from my diet. I decided early on that I would eat fish a couple of times during the month, and I have. And three weeks into this experiment, I’ve eaten meat exactly three times: on the day I decided to go meat-free, my dinner was a pork katsudon bowl at a Japanese restaurant; on one of our regular Friday night dinners with my in-laws, I ate half a chicken thigh; and last weekend I enjoyed an amazing taco smackdown lunch cooked by six different chefs, all of whom used meat as a taco filling. But the fact that I can still remember—and if I close my eyes, still taste—each of these meals proves to me that limiting my intake of meat is giving me an even stronger appreciation of it as more than just a protein to cook with.

And of course, giving up something when you love it means that, inevitably, you’re going to crave it—which brings me to the recipe alluded to in this post’s title. Mushrooms, especially the meatier varieties, can be a perfect substitute for meat if they’re cooked in a dish that brings out their texture and flavour and makes them the star of the show. This recipe was loosely inspired by a mushroom ragout featured in chef Yotam Ottolenghi’s cookbook, Plenty. It came out great, filled me up and definitely didn’t make me miss the lack of meat.

chopped mushroom mix

Mushroom and Lentil Ragout

1 shallot, diced
1 small carrot, diced
A small amount of fennel (or 1 celery stick), diced
A mix of fresh mushrooms (I used cremini, oyster and shitake), roughly chopped
A handful of dried porcini mushrooms, steeped in a cup or so of boiling water for 20 minutes
1 bay leaf
1 can of lentils, drained
1/2 C white wine (NOTE: I didn’t have white wine, so I added 1/3 C of vin santo, an Italian dessert wine)
Ricotta cheese

Remove porcini mushrooms from steeping liquid, and chop them into small pieces. Reserve the steeping liquid.

Heat a couple tablespoons of olive oil in a large pan over medium-high heat. Add shallot, carrot and fennel and sauté about 5 minutes.

Add mixed fresh mushrooms and some salt and pepper. Saute for 5 more minutes, stirring occasionally, then add wine and let it cook off for a couple more minutes.

Add chopped porcini mushrooms, as well as the steeping liquid.

Stir in lentils, and throw in a bay leaf. Turn heat to low and let the ragout simmer for 15 to 20 minutes, until the liquid has reduced by at least half.

Serve in a bowl, topped with a small spoonful of ricotta and a few drops of truffle oil.

mushroom ragout pan

Curried Cauliflower & Chickpea Stew with Kale

30 Oct

It’s crazy how quickly the seasons change. Every year at the start of fall it feels like the weather turns way too quickly and all of the sudden flip flops get replaced with boots, tank tops with cozy sweaters. I always spend a good few weeks in denial, not wanting to say goodbye to the warmth of summer.

And then somehow you reach a point when it finally feels good to welcome fall and the crispness in the air is familiar and maybe even comforting. I made this stew on one such night a few weeks back. It was the day I succumbed & fully welcomed the changing leaves, the need to grab a scarf in the morning and that feeing that there’s no turning back – winter is on its way.

It was the kind of fall evening where it felt really good to be at home, listening to good music, cooking something hot and satisfying in my kitchen.

I was craving something healthy but rich and this stew did the trick. It’s the kind of meal that warms you from the inside out.

I used a Malaysian curry powder blend that I recently bought at Jean’s Vegetarian Kitchen on Danforth (I’m obsessed with their Malaysian Curry Eggplant) and it had the perfect balance of flavors for this recipe. But you can of course make your own blend pretty easily. I would recommend using a mix of dried spices instead of just straight up curry powder because you need that depth of flavor.

The Malaysian curry blend that I used has a really nice kick to it without being overly spicy. It’s a mix of: coriander, cumin, fennel, pepper, cayenne, turmeric, anise, ginger, garlic, cinnamon, mustard seed, cloves, fenugreek & cardamom.

If you don’t have all of those ingredients, I suggest mixing the more common ones: yellow curry powder, garlic or onion powder, ground fennel and cumin, cayenne, turmeric, cinnamon, powdered mustard.

This is the kind of dish that you can’t really screw up. Adjust to your tastes.

Curried Cauliflower & Chickpea Stew with Kale

1 Medium onion, chopped

1 shallot, chopped

2 carrots, peeled and chopped

1 head cauliflower, chopped into medium sized florets

1 bunch of black kale, chopped

1 can chickpeas, drained

1 can coconut milk (regular or light)

1 tin diced tomatoes (I only had whole ones, so I chopped them myself)

5 tsp curry blend (I used Malaysian curry powder and they were heaping tsp’s)

2 tbsp olive oil

Salt and pepper

Heat olive oil on high, add onions and shallot, sauté until brown (about 8 min).

Add the curry powder and sauté with onions for a minute. Add carrots, cauliflower and chickpeas and mix well. Season with a bit of salt.

Add in tomatoes with a bit of the juice and coconut milk. Add in the chopped kale.

Bring to a boil and then reduce heat to low. Cover and let simmer for 20 minutes to a half hour or more. Season with salt and pepper and serve bubbling hot.

Makes great lunch leftovers. I even ate mine cold for lunch the next day and it was delicious.

Moroccan-Spiced Carrots

18 Jun

With Ontario having such a great selection of produce to offer this time of year, I really want to make a point of eating lots of fresh fruits and vegetables, finding ways to work with them that don’t complicate their flavor. And enjoying them raw always makes me feel like I’m getting the very best out of them, both in flavor and nutrients.

A few weeks ago, we spotted these beautiful Ontario-grown heirloom carrots at Rowe Farms in Leslieville, and I knew right away what I wanted to do with them.

I’ve been experimenting with Moroccan-spiced raw carrot salad over the last year and every time I make it, it comes out great no matter what balance of ingredients I use. I like adding a good amount of heat to it, but you can adjust any of the spices to taste.

I’ve tried cutting the carrots into rounds, grating them into fine shards, slicing them into thin long pieces – it’s really just a matter of what you prefer texture-wise.

The mix of Moroccan spices blends so nicely with the earthiness of the carrots. And with the gorgeous colors of the heirlooms, this salad is both bursting with deliciousness & vibrant color. It’s a really easy side dish to pair with just about any meal, especially during barbeque season… 

Moroccan-Spiced Carrots

Approx 8-10 heirloom carrots, varying sizes

1 ½ Tbsp good strong olive oil – I used a bold Portuguese olive oil

½ tsp cumin

¼ tsp paprika

¼ tsp chili flakes – I used a little more for good heat

Light sprinkling of turmeric

¼ tsp true cinnamon

¼ tsp garlic or onion powder

Sea salt

Wash and peel your carrots – but be careful with the purple ones! They stain just like red beets.

Cut your carrots to suit your mood – I like cutting them into chunky small rounds or half moons. 

Throw them into a bowl, add the spices and olive oil and sea salt to taste. Mix well. Let them marinate in the fridge for at least 20-minutes before serving.

Enjoy!


Fried Rice-Style Quinoa with Grilled Pineapple & Cashews

23 May

It probably seems like I’ve completely disappeared off the face of the online world, and to be honest, it kind of feels that way from my end too. But as Neil said in his last post, life has been busier than ever and it’s not only been hard to get back into the groove of blogging, but cooking as well.

But a few nights ago I had a strange craving that sparked some much-needed inspiration and led me right back into the kitchen to turn an idea into a reality. It felt good. Oh, how I’ve missed feeling inspired and motivated in my poor little neglected kitchen.

The unusual craving was for fried rice with lots of veggies. I have absolutely no idea where that came from because I rarely eat fried rice in the first place. But there it was.

I wanted to turn my craving into a one-dish meal that was actually somewhat healthy, so I immediately defaulted to one of my favorite ingredients: quinoa. I wanted to keep it vegetarian so I planned to add a ton of vegetables and some scrambled egg, which is delicious in fried rice anyway. But then thoughts of perfectly grilled pineapple and crunchy cashews invaded my brain and I knew that I had a complete dish on my hands.

Once again Neil made an immediate judgmental face when I told him what I was going to make for dinner. It’s his shtick when it comes to quinoa. He tells himself that he hates it and assumes it’s going to be terrible no matter what I do to it. But seeing as how we’ve been too lazy to cook lately and there I was offering to take care of dinner on my own, he quieted down pretty fast. 

But just as I expected, after a few apprehensive bites, he was in. I could see him liking it more and more as he ate and by the time the plate was completely clean, he admitted that it was a pretty awesome meal that he would absolutely eat again.

I used organic quinoa and I have no idea if it actually made a difference or not, but I will say that once it was cooked, it was totally neutral and had no trace of that sometimes strange/bitter flavor that quinoa can have. I did still rinse it really well before cooking it, but either way, the quinoa took on the flavors of fried rice beautifully.

The pineapple and cashews were such a delicious addition and because I used so much garlic and ginger, there were a few layers of flavor that came through. It would be really great with tofu either instead of or in addition to the egg as well.

We took the leftovers for lunch the next day and ate it cold and it was still great. I may have even gotten a mid-day email from my lovely husband telling me again how much he liked it.

I’ve really missed enjoying the fruits of my labour in the kitchen. There’s nothing like coming up with a great idea, seeing it through and enjoying its success. Especially when your skeptical husband admits you were right… that’s always a bonus.

Fried Rice-Style Quinoa with Grilled Pineapple & Cashews

Sesame oil

½ large white onion

2 cloves garlic, chopped

1 large knob of ginger, chopped

Carrots, chopped

Oyster mushrooms, chopped

Broccoli florets

3 Eggs

Tamari soy sauce (or regular soy sauce)

Fresh lime

Green onion, chopped

1 cup quinoa

2 cups water

3-4 fresh pineapple rings

Handful of cashews, roughly chopped

Rinse the quinoa really well under fast-running cold water. Bring the 2 cups of water to a boil in a saucepan and add the rinsed quinoa. Reduce to a simmer, cover and cook for approximately 12 minutes. Remove from heat, fluff with a fork, cover and set aside. 

Heat a grill pan on high heat until it’s really hot. Place the pineapple rings in the pan and grill on each side until the outside has nice dark grill marks and is nicely caramelized. Take off the heat and set aside.


Heat a wok or large pan on medium high heat until really hot. Add some sesame oil and the onion. Cook until the onion is nice and brown. Add the ginger and garlic and cook for a few minutes. Add in the chopped carrot and broccoli florets and cook for a few more minutes.  Add the chopped mushroom and keep cooking until any moisture has evaporated. I raised the heat slightly to help cook off the liquid from the mushrooms.

Add some soy sauce (to taste) into the pan and stir-fry well.

Add the cooked quinoa to the stir-fried vegetables and mix. I added a touch more sesame oil to flavor the quinoa and to help it stir-fry in the pan as well. Drizzle in more soy sauce, if needed, and squeeze the juice of half a lime overtop. Mix well.

Whisk the eggs in a small bowl. Make a well in the centre of the hot pan and add in the eggs. Scramble in the pan and then mix to distribute through the quinoa.

Plate the stir-fried quinoa and add the grilled pineapple on top. I chopped the pineapple into bite size pieces, but you can leave the rings whole. Top with chopped cashews and green onion and serve with a lime wedge and some sriracha for a bit of heat.

Food Find: Celery Root

20 Apr

This isn’t really a true ‘food find’ since I have seen celery root many times before, staring me in the face as I walked through the vegetable isle in the grocery store, looking like an alien life form.

I would always notice it, sitting there looking intimidating, strange and confusing. Which is why I was so intrigued when I spotted Ontario-grown celery root on the shelf at Rowe Farms in Leslieville a few weeks ago.

I picked up one of the round, furrowed bulbs and curiously asked someone behind the counter for his opinion on the best way to cook it. He advised me to scrub it carefully to remove dirt and then steam or boil it, keeping as much of the skin on as possible, because that’s where all the good nutrients are. Great tip. I appreciated that. He also told me to think about adding a bit of sweetness to the final product since it tends to be quite bitter.

Celery root, often called ‘celeriac’, is related to celery, though grown as a root vegetable. Unlike other root vegetables though, it’s lower in starch, which makes it a great choice for a side dish mash or puree.

When you cut into it, it immediately smells like traditional celery but with an earthier kick. The taste is actually milder than celery though but definitely has an earthiness. I didn’t find the ones we bought to be too bitter but I still took the advice I was given to heart.

I decided to make a simple chunky mash with clean flavors so we could really appreciate and taste the celery root. All I added to the mash was some honey, olive oil, a touch of onion powder and salt. It was delicious.

It had a really great texture and I was happy that I left some of the skin on and mashed it roughly. It was creamy yet chunky at the same time and nice and thick without being gluey like mashed potato or other starchy root vegetables. It had a really nice earthy flavor but it wasn’t bitter in an unpleasant way at all. The sweetness from the honey just helped season it up a little, along with the other simple ingredients.

We served it alongside lemon chicken and it was a perfect pairing.

I’m very intrigued to try cooking with it in different ways. I think it would be fantastic mashed with roasted apple or pear to add that sweetness instead of honey, or pureed with asparagus or something similar and served with fish. It also tasted really good raw, so I’d like to find some interesting ways to use it as is.

Moral of the story: Don’t be afraid of the alien-like fruits or vegetables calling out to you on your next visit to the grocery store of farmers market! There could be something really amazing lurking beneath the surface…

Chunky Celery Root Mash

2 bulbs of celery root

Good olive oil

Honey

Onion Powder

Sea Salt

Grab your celery root and a good vegetable scrubbing brush and scrub it well under warm water.

Cut off the top and bottom of each celery root bulb and any wiry, nubby parts, keeping as much skin as you can to keep all the nutrients.

Cut into cubes. Steam or boil the celery root chunks until tender. I used a microwavable steamer and steamed them for 10 minutes.

Mash with a potato masher, add in some olive oil, sea salt, honey, onion powder (or garlic powder) to taste.

Serve as you would mashed potato or any other mashed root vegetable. 

Brie & Strawberry Jam Omelet with Strawberry Panzanella Salad

13 Apr

It’s been a little quieter than usual around here lately. We’ve been dealing with some career changes and general life shifts, not to mention unavoidable winter colds and flu bugs over the last few months. All of that has been keeping us more occupied in ‘real life’, which has meant less time for us to devote to our blogging life and cooking in general.

We’re slowly getting back into a groove, but the last few weeks we’ve been leaning towards cooking meals that are simple and fast while still being interesting.

Last week I reached into my ‘archives’ when we wanted to make a meatless dinner that was in line with the changing weather and freshness of spring.

I discovered the unexpected pleasure of the brie and strawberry jam omelet many years ago on a visit to Montreal. It stood out for me on the brunch menu at Orange Café in the NDG area of my hometown. I rarely use this adjective when describing food, but I have to say that this is one ‘sexy’ omelet. It’s the perfect combination of textures, flavors and even colors on the plate. I even made it for Neil when we first started dating in an attempt to impress his advanced palate.

Once I started making it at home for brunch and dinner, the very idea of it inspired other omelet combinations like cheddar and spicy mango chutney, or havarti and pear & ginger preserves.

But this one’s the ultimate. L’original.

This time around I used goat brie for a little more earthiness and Greaves Rhubarb Strawberry Jam, which I absolutely love. There’s not much to this simple omelet, but the key for me is using just the egg whites. With the egg whites providing a neutral base, the cheese and jam really shine and stand out. I also like the texture of an all-egg white omelet better than what you get when you include the yolks.

But we needed a side dish. Something that could stand up to the fabulousness of the omelet and complement it at the same time.

Somehow the idea of a fresh strawberry panzanella came to me. Panzanella is a rustic Italian bread salad that’s usually made with stale bread, tomatoes, onions and a simple vinaigrette. I always order it when I spot it on restaurant menus because it’s usually delicious, however simple.

Neil was the one who actually executed our take on the classic salad after we talked about some ideas, and it turned out even better than I had hoped. The sweetness of the fresh strawberries worked so well with the tartness of the balsamic and the shreds of basil. And we actually used fresh bread instead of day-old and found that it gave a really nice spongy consistency on the inside, and a toasty crunch on the outside. It was a great texture combination and the flavors of each ingredient came through. It really was a great complement to the omelet. We ooh’ed and ahh’ed with every fresh, tasty and flavorful bite.

What better way to welcome spring to our table?!

Brie & Strawberry Jam Omelet with Strawberry Panzanella Salad (serves 2)

For Strawberry Panzanella Salad:

Approx 8 fresh strawberries (3-4 per person)

Good quality balsamic vinegar

Pepper

Approx 3/4 to half a loaf of crusty bread (we used Brick Street Bakery‘s wheat bread)

Olive oil

Sea Salt

1 clove garlic, sliced into thin slices

1 handful of basil leaves, chopped

Cucumber, chopped

Arugula

For Omelet:

Approx 6-7 thick slices of brie (we used goat brie)

Good quality strawberry jam (we used rhubarb strawberry)

Approx 6-8 egg whites (I actually used egg whites from a carton – so much easier!)

Cooking spray

To Assemble Salad:

Slice the strawberries and add them to a bowl with a couple of tablespoons of good balsamic vinegar and a grind of pepper. Leave to marinate for 30 minutes to an hour.

Cut the bread into cubes and toss with a few drizzles of olive oil and a few grinds of sea salt.

Slice the garlic into thin slices that will be easy to remove later from the pan.

Heat a small amount of olive oil in a pan on medium heat and cook garlic for a few minutes. Lower the heat to medium low, add bread cubes into pan and cook for a good 7-10 minutes until nice and brown on the outside.

Remove the bread cubes from the pan, leaving the garlic behind, and set aside to cool.

When ready to assemble, add the cooled bread cubes to a bowl. Add in a little bit of arugula. You don’t want to add as much as you would in a regular salad, the bread and strawberries are the main ingredients here. Add the chopped cucumber and basil. Drizzle in some good quality olive oil and toss into the salad with a little bit of sea salt.

Spoon the balsamic strawberries into the salad, reserving some of the liquid. Mix the salad and taste. Add more of the balsamic to taste. Toss everything together well and serve.

To Assemble Omelet:

Spray an omelet pan with a little bit of cooking spray and heat the pan over medium low heat.

Add in the egg whites and leave them for a few minutes to firm up. Slide a thin spatula around the edges to lift and separate from the pan.

Layer the slices of brie down the middle of the omelet or just off to one side, depending on how you like to fold your omelet. I decided to fold the two sides in so I layered my ingredients into the middle but you can also attempt to flip one side onto the other. Spoon a generous amount of jam onto the brie.
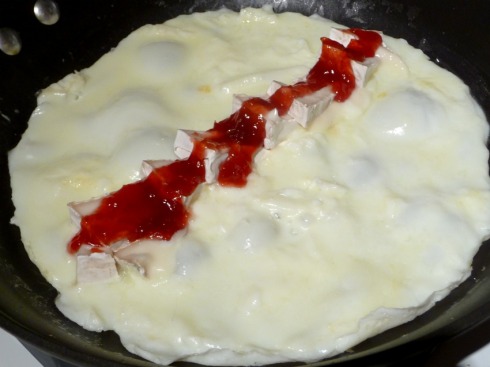
Fold in the sides and slide the spatula underneath to loosen the omelet from the bottom of the pan. Let it cook for a few minutes to let the cheese melt and jam warm through. If you’re feeling daring, you can flip the omelet over and let it cook on the other side for a few seconds so the brie melts on both ends and the jam gets sticky and cooks as it oozes out of the edges.

Cut the omelet in half to serve two and plate with some Strawberry Panzanella salad.

Middle Eastern “Caesar” Salad

8 Apr

A few weeks ago some friends and I threw a baby shower lunch for a wonderful mom-to-be. We put out a delicious spread, including some hummus that I quickly jazzed up with a sprinkling of za’atar. I couldn’t believe how many people actually made a point of asking me what it was or why the hummus tasted so good! Multiple people commented on how delicious it was and hardly any of them had heard of my incredibly handy ‘secret ingredient’.

If you haven’t tried za’atar, take a look for it next time you’re in a spice shop or specialty food store. It’s a blend of herbs including oregano & thyme mixed with sesame seeds, sumac and salt. It’s often used in Middle Eastern cooking and it’s a truly divine spice mix to add to your spice collection.

One of my favorite ways to eat it is just simply sprinkled onto lightly olive-oiled pita bread, warmed and toasted in a toaster oven. It makes a great accompaniment to salad.

But an idea came to me that builds on that idea and brings the za’atar and bread right into the salad itself. Enter homemade za’atar croutons.

I never think to make croutons myself and I don’t particularly like store-bought ones, but after proving to myself how easy and painless it is to make them at home, I have a feeling I’ll be adding them to my repertoire. It was so easy and they tasted so good without being too buttery or overloaded with oil and grease.

I didn’t really know how this salad was going to turn out, but the flavors of tahini and lemon were no-brainers when I was dreaming up what would blend well with my za’atar croutons.

Putting this whole salad together took very little time, effort and amount of ingredients. I made it as a side dish to accompany fish, but I think it would make a killer main dish salad with the addition of baked falafel balls or grilled chicken.

The dressing is so creamy and rich and the croutons are so decadent and flavorful, that upon taking the first bite, I immediately thought “Middle-Eastern Caesar!” In reality, it has nothing to do with a true Caesar salad, but it’s reminiscent of one in it’s own special, spiced-up way.

Middle Eastern “Caesar” Salad

Dressing:

1 big Tbsp tahini

Juice of half a lemon

Onion powder to taste

Cumin to taste

Olive oil

Hot water

Sea salt

Croutons:

Good quality bread (fresh or day-old), cubed

Olive oil

Za’atar

Sea salt

Salad:

Arugula

Cucumber, chopped

In a bowl, toss bread cubes with a few drizzles of olive oil and a little bit of sea salt. Add about a teaspoon of za’atar (or to taste) and toss to coat.

Heat a frying pan on medium heat and add in the bread cubes. Toast for approximately 10 minutes, constantly turning the pieces of bread until all sides are nice and golden.

Remove from heat and set aside.

In a small bowl, whisk the tahini with the lemon juice. It will firm up quite a bit. Add in small amounts of hot water, a little bit at a time, until you get a nice smooth consistency. Drizzle in a little bit of olive oil and mix. Add some onion powder, cumin and a little bit of sea salt. Whisk everything together and set aside.

In a large serving bowl, add the arugula and cucumber. Dress it with the tahini dressing and toss well. Add in the za’atar croutons and give it one final toss before serving.