Archive | Healthy RSS feed for this section

Sisterly Pride and a New Favorite Snack

14 Nov

I have three younger sisters and I’m insanely proud of all of their accomplishments and choices in life. It was a life-altering experience that led my youngest sister Jill to a career in holistic nutrition. And aside from my usual sense of pride, I’m also grateful that as a result, she’s introduced me to a whole new world of delicious and health-conscious food.

After overcoming a very serious case of shingles that put her whole life on hold for almost a year, my sister left a stress-inducing career in fashion to go back to school for holistic nutrition. It wasn’t until she took control of her own health and educated herself that she was able to fully heal.

Jill has come a long way and has worked hard to build her new career path. She’s now a practicing holistic nutritionist in Ottawa and will be teaching cooking classes at a clinic called Revivelife. She also works for a great company called Enerjive, which has created a line of healthy snacks: Quinoa Skinny Crackers.

I would never endorse a product I didn’t truly believe in or feel passionate about. But after my sister introduced me to Quinoa Skinnys I fell in love with my new favorite snack. I’ve tried every single flavour, two savory and three sweet, and I’m having a hard time deciding which one is my top pick. It’s a toss up between ‘Heat’ (garlic & cayenne) and ‘Fix’ (chocolate).

The savory flavours really hit the spot when I’m craving something salty and the sweet ones are just sweet enough to curb my afternoon sweet craving without a sugar crash or an overpowering sense of guilt.

Jill likes to use the rock-salt flavor ‘Crave’ as a crust for baked tilapia. Enerjive has shared some of their own recipes for yummy granola-style mixes below. They sent me samples of each and I liked them so much, I ate them with plain Greek yogurt for breakfast every morning until my stash was gone. And when it was I just crushed up one stick of the apple cinnamon ‘Cozy’ flavor and one stick of the lemon berry ‘Burst’ flavor and tossed the pieces on top of my plain Greek yogurt along with some dried coconut and a drizzle of buckwheat honey (pictured at the top).

Quinoa Skinny Crackers are available at select stores across Canada. Check out Enerjive’s website for store locations and more info.

Giveaway: If you’re dying to try them for yourself, we’ve got one lovely gift basket including all five flavors for one lucky reader (within Ontario only). All you have to do is leave us a comment below telling us about your most favorite healthy snack. We’ll choose one random winner and the gift pack is yours.

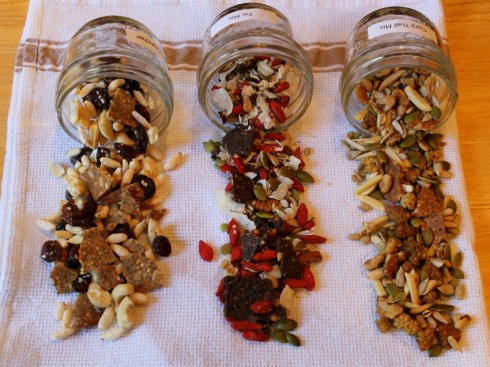
Thanks to Enerjive for sharing the following recipes for their three granola-style mixes! (I loved them all, but the salty/sweet Crave Cruncher won my heart)

Each recipe makes 2 cups (6 servings)

Cozy Trail

6 Enerjive apple cinnamon Cozy Skinnys, roughly chopped

½ cup dried mulberries

¼ cup each: walnut pieces and slivered almonds

¼ cup each: sunflower seeds and pumpkin seeds

¼ tsp ground cinnamon

In a large bowl, combine ingredients well. Transfer and store in an airtight container in the refrigerator.

SKINNY TIP: Keep mix in the fridge to retain flavours and freshness and prevent nuts and seeds from going rancid.

Crave Cruncher

6 Enerjive rock salt Crave Skinnys, roughly chopped

1/2 cup raw cashews, roughly chopped

1/3 cup brown rice puffs or quinoa puffs

1/3 cup each: dried cranberries and dark chocolate chips or pieces

2 tbsp sesame seeds

In a large bowl, combine ingredients well. Transfer and store in an airtight container in the refrigerator.

SKINNY TIP: Add crave cruncher to your oatmeal or a top a fruit salad for added crunch!

Fix Mix

6 Enerjive chocolate Fix Skinnys, roughly chopped

¼ cup pecans, roughly chopped

¼ cup each: sunflower seed and pumpkin seeds

¼ cup each: unsweetened coconut flakes and dried goji berries

2 tbsp each: cacao nibs and hemp seeds

In a large bowl, combine ingredients well. Transfer and store in an airtight container in the refrigerator.

SKINNY TIP: For added flavour, toast sunflower and pumpkin seeds before adding into the mix.

Homemade Chicken Burgers – A Kickoff to Summer!

30 May

Summer’s here, and it seemed to come on fast. I was just getting used to the no socks with shoes thing when full-on sandals and bare legs weather came out of nowhere.

But I say bring it on.

I love this time of year and I find it inspires me to dream up seasonally appropriate meals meant to be eaten outdoors.

The other night I had a craving for chicken burgers, and we initially went hunting for good quality pre-made ones at a local butcher shop. But when we couldn’t find any, I decided to make them from scratch and I’m so happy I did. It was way less of a big deal than I originally imagined, and it was worth it once we sat down to dig into these juicy and flavorful burgers.

It was Neil’s idea to buy ground chicken breasts and ground chicken thighs. I think that’s what ensured the chicken burgers were so tender and juicy and not dry. 

I’ll admit I’m a bit of a nut when it comes to kitchen safety and bacteria where chicken is concerned. I often avoid cooking it altogether because I’m that paranoid about salmonella poisoning (Yes, there was a traumatic experience in my past that made me this way).

But luckily, with chicken burgers you pretty much only need to use one bowl and one platter to hold the patties once they’re formed. I’m not going to lie though, I did throw on a pair of latex gloves to mix the meat by hand and form the patties. It actually worked beautifully! (If this makes me a freak, at least I’m a cautious freak.)

These chicken burgers are simple enough in flavor that they won’t fight with any toppings, but flavorful enough that you don’t need to heap the toppings on if you don’t want to.

We ate ours with guacamole & spicy greens on one night and with Peri-Peri hot sauce & sweet/spicy preserved shallots on another. They’re pretty versatile and would probably go well with anything you dream up to top them with.

Happy summer!

Communal Table’s Chicken Burgers

1 package ground chicken breasts

1 package ground chicken thighs

2 large shallots, diced

Handful of cilantro, chopped

Garlic powder

Onion powder

Ground cumin

Ground coriander

Sea salt and fresh ground pepper

**All spices to taste (eyeball it!)

Mix all the ingredients really well in a bowl and form into patties. If you’re a paranoid bacteria-phobe like I am, use gloves for this step but either way, make sure you wash your hands well and be careful about cross contamination.

Barbeque the burgers for approximately 6-7 minutes per side on medium-high heat.

Serve on a delicious bun along with your favorite toppings and eat outdoors – it’s summer!  

Eating Raw with Doug McNish + a Giveaway!

22 Apr

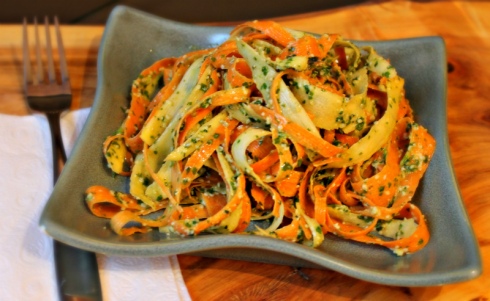
Parsnip carrot pesto fettucine

Several factors have prompted me to reconsider how I eat over the past couple of years. The first thing is simple enough: I’m getting older, and if I’m going to continue to eat bacon and foie gras from time to time, I know I need to focus on lighter and healthier meals when I’m not consuming rich foods. Also, I’ve slowly but surely gotten onboard with Jenny’s fascination with vegetarian cooking. And with my sister-in-law embarking on a career as a holistic nutritionist, I’m getting healthy eating info from yet another source.

So when I was sent a copy of Toronto chef Doug McNish’s first cookbook, Eat Raw, Eat Well, my curiosity was piqued. While I can probably count on one hand the number of raw food dishes that I’ve eaten, I’ve been pleasantly surprised by the flavours in most of them (If you haven’t had the jicama fries from Belmonte Raw, for example, you’re missing out.)

Raw food, in a nutshell, is vegan in most cases, and focuses on maintaining as many of the nutrients as possible in the ingredients used. That means that most of the dishes are prepared without heat, and those that do use heat are not heated beyond roughly 105 degrees. Given those parameters, someone who has never eaten raw might be excused for thinking that raw food must be boring and limited in flavour. But as I pointed out above, that doesn’t have to be the case, and the 400 recipes in Doug McNish’s book prove that. There is a wide variety of recipes for smoothies, breakfast foods, soups, mains and desserts that incorporate vegetables, herbs, fruit, grains, legumes and nuts to create flavourful and multi-textured meals.

But there are clearly some limitations for those not fully invested in the raw food lifestyle. First, the heated dishes sound interesting, but require a food dehydrator (something my cramped kitchen isn’t equipped with). I can get my oven down as low as 170 F, but only a dehydrator can cook at a controlled 105 degrees, the temperature called for in most of these recipes.

The book also doesn’t include cooking times. The recipe we tried, below, was prep-heavy. And while the 25 minutes or so that I spent preparing “noodles” with a veggie peeler was fairly low-stress work, I’m not sure I would have felt the same way on a Tuesday evening as I did on a Sunday afternoon. With cooking times listed, it would be easier to gauge which recipes one should attempt with the time they have available.

Finally, there’s no nutritional value listed for the recipes in Eat Raw, Eat Well. We were concerned with the amount of protein in the dish we prepared, so we ate it alongside salmon.

That said, this book is definitely staying in my kitchen. I can see myself working more raw meals into my diet, and I do think that a lot of the recipes here would also make for amazing side dishes next to fish or egg dishes.

Want to win a copy of Eat Raw, Eat Well? We have one copy to give away to a reader of Communal Table. Just leave a comment below, letting us know why you want to win this book. We’ll pick a winner from all comments left by next Saturday, April 28, and post the winner’s name here as well as letting them know via email. Good luck!

UPDATE 4/30: Congrats to “Onadistantshore,” who won our draw for a copy of Eat Raw, Eat Well. Enjoy the book!

Carrot parsnip fettucine McNish raw

Doug McNish’s Pesto-Coated Carrot and Parsnip Fettuccine (Makes 2 servings)

When Jenny and I made this, we decided to use just two garlic cloves instead of the three called for below, and in hindsight I think I’d use a bit less hemp seed oil than called for (maybe 2/3 of a cup). But we loved the fresh, vibrant flavour of the dish, and we’ll definitely make it again.

3 large carrots, peeled
3 large parsnips, peeled
1 tbsp (15ml) tbsp cold-pressed (extra virgin) olive oil
1⁄4 cup (60 ml) freshly squeezed lemon juice, divided
1 1⁄2 tbsp (22 ml) fine sea salt, divided
3⁄4 cup (175 ml) cold-pressed hemp oil
1⁄2 cup (125 ml) raw shelled hemp seeds
3 cloves garlic
3 cups (750 ml) chopped fresh cilantro leaves

1. Using a vegetable peeler, peel carrots and parsnips into long, thin strips, dropping into a bowl as completed. Add olive oil, 1 tsp (5 ml) lemon juice and 1⁄4 tsp (1 ml) salt and toss until vegetables are well coated. Set aside for 10 minutes, until softened.

2. In a food processor fitted with the metal blade, process hemp oil and seeds, garlic and remaining lemon juice and salt, until somewhat smooth but the hemp seeds retain some texture. Add cilantro and process until chopped and blended, stopping the motor once to scrape down the sides of the work bowl. Add pesto to fettuccine, toss well and serve.

Excerpted from Eat Raw, Eat Well by Douglas McNish © 2012 www.robertrose.ca Reprinted with permission. All rights reserved.

The Best Kale Salad with Sweet Sesame Dressing

14 Mar

Kale has become a hot & trendy little vegetable lately, which is fine by me because I love finding it on restaurant menus everywhere I go. But I’ve been a kale admirer for many years and it’ll continue to be my favorite leafy green even when its fifteen minutes of foodie fame are up.

I absolutely love this powerhouse vegetable. Every time I eat raw kale I feel amazing inside. It’s the only food that has an almost instant effect, making me feel like I’m doing my body good by eating it. And it tastes amazing! It’s so earthy and hearty and the flavor changes and intensifies based on what you do with it.

I love it roasted, steamed, sautéed, juiced, baked, and, of course, in ‘chip’ form, but the best way to eat kale is most definitely raw.

I sometimes like to just toss it with olive oil, sea salt, lemon and a touch of maple syrup; but this easy sesame dressing is one of my all-time favorites and it stands up to and pairs so nicely with the boldness of kale.

I make this sesame dressing often. When I feel like cleaning a slightly bigger mess, I use a blender to mix it, which gives a really nice, smooth and creamy consistency. But when I don’t have the patience, I just whisk it up in a small bowl and add the hot water in a little bit at a time while whisking to smooth it out.

The photos here show a dinner salad that I made last week with a mix of red and green kale, raw cauliflower and crunchy bean sprouts. Kale is a great green to eat as a meal because it’s so filling and full of goodness. And it holds up nicely as a weekday take-to-work lunch salad because it doesn’t really get soggy like other lettuces when it’s dressed. 

This dressing would also be amazing on sautéed or steamed spinach with some sesame seeds sprinkled on top.

Kale Salad with Sweet Sesame Dressing

Bunch of kale, washed & torn into bite sized pieces

¼ cup tahini

2 tbsp tamari soy

2 tbsp agave

Hot water, to taste (to thin out the dressing)

Sesame seeds – optional, for sprinkling

Use a blender or a small mixing bowl and whisk. Mix the tahini, tamari soy and agave until blended. Add in hot water a little bit at a time until you get a consistency that you like.

Toss kale with sesame dressing and sprinkle with sesame seeds. 

* I did find this general recipe online somewhere a few years ago but I can’t remember where it came from so I can’t source it properly. 

Eggs, Butternut Squash and Zucchini for Meatless Monday

12 Mar

poached egg braised zucchini butternut squash puree

As I mentioned in a recent post, I’ve been thinking a lot more lately about cooking interesting vegetable-based meals. When I cook, my default is usually to start with meat, because most meats are full of flavour and provide a good base around which to build a satisfying dish. But with the right amount of attention and care, vegetables can also star in some amazing meals.

Recently, Jenny and I had the chance to eat at Ursa, a new restaurant in Toronto that’s being talked about because of the kitchen’s focus on using innovative techniques – dehydration, compression, sous vide – to create big flavours while still retaining as much of the nutrients as possible in each ingredient. We split a selection of appetizers and mains in order to taste as much as possible. It was an amazing meal, but my favorite dish – and one of the best restaurant mains I’ve ever eaten – turned out to be little more than a plate of seasonal vegetables. In fact, the dish was simply called “Seasonal Vegetables” on the menu. But what that description didn’t convey was that the textures and tastes of the vegetables on the plate were surprisingly, mind-blowingly bold. The ingredients in the dish still tasted like the vegetables that they were, but each was treated with so much care that the finished product had as much flavour as any great meat dish. Here’s an iPhone shot of the dish, which doesn’t do it proper justice, as it was as beautiful to look at as it was amazing to eat:

Ursa Toronto restaurant

If my meat-free experience in January was an awakening, my vegetarian main at Ursa was a revelation. I’m never going to fully give up meat, but I’m determined to experiment more in my kitchen with the potential to build great recipes around vegetables – and that determination is where the idea for this recipe came from. By preparing different vegetables – in this case, butternut squash, zucchini, kale and tomatoes – using different cooking methods and flavourings, I hoped to create a composed vegetarian dish that was healthy and satisfying, with different tastes and textures on the same plate.

In the end, I think I achieved what I set out to do. Jenny – who loves all things vegetarian – talked about how much she liked the meal, and I really didn’t miss the lack of meat at all. I’m sure I’ll be making this again, and will continue to experiment with vegetables in my cooking.

Poached Egg on Butternut Squash Puree with Braised Zucchini

For the braised zucchini:

Preheat oven to 350 degrees

Cut two zucchinis lengthwise into spears

In a bowl, mix together 2 tablespoons of honey, half a teaspoon of cumin, the juice of 1/4 of an orange, and a grind each of pepper and salt

Place the zucchini spears in a small oven-proof dish and toss with the honey marinade

Bake for about 30 minutes, turning spears halfway through cooking time (the goal is to cook the zucchini until it’s slightly limp but not too soft)

For the butternut squash puree:

Empty 1 can of butternut squash puree into a saucepan over medium-low heat

Stir in half a teaspoon of fennel pollen, a grind of pepper and a pinch of salt

Stir in 2 tablespoons of ponzu soy sauce


Poach one egg per person. Place some of the butternut squash puree in the centre of a plate, top with a poached egg and four or five of the braised zucchini spears. Serve alongside a dark, leafy green salad – I made a simple salad of kale and cherry tomatoes tossed with a tahini dressing.

Mushroom & Kale Polenta Hash with Eggs

11 Mar

Image

I cherish my weekends. I try to savor every minute of the two glorious days where I can shed (most) responsibility & stress and just be. And savoring them over a delicious brunch is pretty much as good as it gets. 

But Neil and I have made a promise to eat out less and cook at home way more, and that means brunch falls in my hands. 

For some reason, despite being an amazing cook, Neil’s intimidated by breakfast. His creative ideas cease to flow pre-coffee, and just the thought of having to figure out what to eat seems to push him over the edge. Though I don’t mind because breakfast and brunch is definitely my domain. 

I love thinking of interesting breakfast creations, brewing up a pot of good coffee, turning on some weekend-appropriate music and getting to work in the kitchen. 

As much as I love meeting friends for brunch and having someone else cook for me in my down time, taking the time and care to make something beautiful myself and then sitting down with my husband at our own kitchen table to enjoy it, is a bit of weekend bliss. 

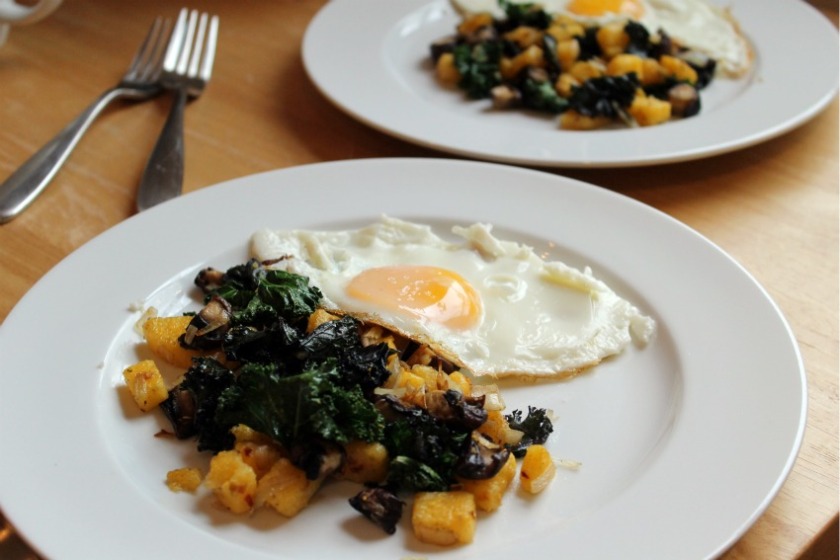
Here’s a quick and delicious brunch that I made yesterday, using what we had in our fridge. 

When I spotted the polenta and mushrooms, I imagined an earthy, savory hash to go with eggs. I cooked the eggs medium so that the yolks were still rich and runny but not too thin or liquid-ey when they broke. There’s something so satisfyingly perfect about breaking a rich egg yolk overtop of savory ingredients and taking a bite of everything together. 

With a cup of dark coffee, I think this brunch stands up to the best of them. 

Oh, and it took about 12 minutes to throw together. Way less than standing in a brunch lineup!

Mushroom & Kale Polenta Hash with Eggs 

1 log of Italian-style pre-cooked polenta

Bunch of kale (I used a mix of red and green)

Cremini mushrooms (I used 2 medium-sized ones for two people)

1 large shallot

Olive oil

Thyme-infused olive oil or fresh or dried thyme

Sea Salt

Pepper

Red chili flakes

Eggs

Image

Cut off a few rounds of the polenta (I used three) and then chop them into small cubes.

Chop the shallot and mushrooms into small pieces and tear the kale into small bite-sized pieces as well.

Heat a bit of olive oil in a pan over medium heat and sauté the shallot for a few minutes, seasoning with a bit of salt. Add in the kale and mushrooms and cook for a few more minutes before adding in the polenta cubes. Sautee everything together, season with pepper and a few chili flakes.

I drizzled just a little bit of Nudo’s thyme-infused olive oil into the hash, which added such a great earthy compliment to the mushrooms and kale. You could use some dried or fresh thyme instead, but only use a little bit so as not to overwhelm.

Cook on medium-low heat until the polenta cubes are a bit crispy on the outside.

Meanwhile, heat another pan and cook a few eggs sunny-side up. I cooked ours to medium so the yolk was still gloopy and runny, but not too liquid-ey.

Plate the polenta ‘hash’ and top with eggs.

Happy weekend!

Thrown Together: Spinach Salad with Pomelo, Seared Scallops & Calamari

21 Feb

Life is busy. That is one constant in my life that I don’t see shifting anytime soon. Even without kids, it often feels like my head is spinning all day long just trying to get everything done.

So despite loving to cook, we more often than not scramble to get dinner on the table and during a busy week it can feel like more like a chore than a pleasure. Some nights a bowl of cereal looks mighty appealing when weighing the effort, time and thought that has to go into making anything else.

But we often find on those unmotivated nights that when we push ourselves to think of/create easy dishes that don’t require a ton of time or clean up, we feel so much happier in the end that we resisted pulling out the cereal boxes (or our even-worse habit of just going out to eat instead). 

Last week we had just that kind of night. Leaving work after a long and brain-draining day (followed by an even more draining yoga class), the last thing I wanted to do was stop at the grocery store and wrack my brain for what to make for dinner. But somehow I pushed myself to go.

I was in one of those no-mood-in-particular moods (read: totally indecisive) and when I called Neil to try to force him to tell me what to buy, I found him to be in exactly the same state.

There was talk of buying frozen pizza (yes, we have been known to go for that kind of lazy convenience – we are human, after all) or defaulting to our usual go-to eggs for dinner, but when I walked by the fish counter I was reminded how easy it is to quickly cook up fish and seafood, and I finally got a spark of inspiration.

I bought four scallops and a few pieces of calamari. I remembered that I had a beautifully sweet pink pomelo waiting for me at home (a bit of an obsession this time of year – they smell amazing and taste even better!) which sparked the idea of throwing together a really easy salad. I grabbed some fresh spinach – earthy spinach, sweet pomelo, meaty seafood, tangy dressing – the only thing missing, in my mind, was something pickle-y. So after grabbing a few pickled hot peppers from the antipasti bar (they were hot yet sweet) I raced to the checkout and then home.

Neil was skeptical about how this meal was going to come together (fish? fruit? pickled peppers?). But once we threw it all together – Neil in charge of searing the fish, me in charge of prepping everything else – and sat down to the first bite, we were immediately happy that we saved the cereal for breakfast and opted for this quick, beautiful, fresh and balanced home-cooked meal.

Here’s what we used:

4 large scallops

3 pieces of raw squid and a few tentacles

1 pink pomelo, peeled with the white membrane removed and flesh cut into small pieces

Handful of hot/sweet pickled peppers

1 garlic clove, minced

Juice of 1 lime

Really good, strong & fruity olive oil

Salt and pepper

Here’s how we did it:

Neil brushed the scallops and calamari with a bit of olive oil and seasoned the scallops with salt, pepper and some fennel pollen. You can use any combo of spices to season up your scallops. He heated a cast iron pan until it was pretty hot and then seared the scallops for about 2-3 min per side, then removed them and cooked the calamari in the same pan until it was cooked but not overdone (a couple minutes per side should do it). 

Meanwhile, I opened a bottle of white wine, tore into the pomelo and cut up the sweet flesh into small bite sized pieces. (**Note – the pomelo is a deliciously sweet citrus fruit that taste like a more mild version of grapefruit. It’s so refreshing and lovely but with it’s abundantly squishy/spongy peel and coarse membrane it’s a total pain in the butt to peel. Here’s a great step-by-step on how to tackle it)

I then made a quick dressing mixing the olive oil, garlic and lime juice until really well-incorporated. I chopped up the pickled peppers into small pieces and added them to the spinach. I tossed the spinach and peppers with the dressing, plated big portions onto two plates, and added the pomelo on top.

Neil cut the calamari into small bite-sized pieces and placed a handful onto each plate along with 2 scallops each.

We sat, we ate, we drank wine, we talked and enjoyed each other’s company at the end of a long day. And after we reveled in how well the flavors of this cobbled-together salad came together in the end, we thanked each other for not giving into the cereal/frozen pizza trap and opting for something unique and fresh instead. 

Seared Tuna Wraps with Mango, Asian Slaw & Creamy Sriracha Sauce

15 Jan

A few weeks ago Neil and I stopped into a mid-range restaurant to grab a quick weeknight dinner. It wasn’t anywhere fancy (and it shall remain nameless) but it was nice enough to expect that the $15-$26 mains should come to the table well-cooked, well-seasoned and well, in restaurant-quality shape. When the $16 tuna wrap promising “seared ahi tuna, asian slaw & wasabi aioli” showed up, we squinted in an attempt to find the scarce pieces of cold tuna stuffed inside the oversized, overly-bready wrap, could barely detect any Asian flavors in the ‘slaw’, and couldn’t taste or see even a hint of wasabi aioli. We were peeved. Where was the flavor? The effort? The tuna?!

My tolerance for mediocre restaurant food is reaching new lows.

I looked at Neil and said “for WAY less than $16 bucks, we could make this ourselves at home and actually do it right”.

So we did.  With a few twists. And it was fabulous.

Here’s a surprisingly easy weeknight do-it-yourself meal that’s full of flavor and tastes even better the next day wrapped up for a satisfying lunch.

Seared Tuna Wraps with Mango, Asian Slaw & Creamy Sriracha Sauce 

For the Asian Slaw:

Cabbage & carrot, shredded (or for super ease use a packaged pre-chopped slaw)

Grated ginger

2 green onions, chopped

Juice of half a lime

A few splashes of Mirin or rice wine vinegar

A few splashes of soy sauce

A couple of small splashes of sesame oil

Pepper

Toss all the ingredients together in a bowl and set aside.

Creamy Sriracha Sauce:

2 Tbsp plain yogurt

1 Tbsp low fat mayo

Chives, chopped

Zest of half a lime

Juice of half a lime or lemon

A few squirts of Sriracha – start with small amount and keep adding to adjust the level of heat to your taste

Sea salt to taste

Mix the first 5 ingredients together in a small bowl. Add in a few small squirts of sriracha at a time, starting with a small amount and adjusting the level of heat to your taste. Season with sea salt. Set aside.

For the Seared Tuna:

1 tuna steak – big enough for two people to share

Canola oil

Ground pepper & sea salt

Rub the tuna with a bit of canola oil and a little bit of salt on both sides. Add a good amount of pepper to coat both sides.

Heat pan on medium-high heat until it’s really hot and then add the tuna to sear it. Cook for approx 2-2.5 min a side and remove from heat promptly so it doesn’t overcook or cook through. Let it rest for a few minutes and then slice into it. It should be rare on the inside. Slice into thin strips.

Slice one whole mango into thin strips, squeeze the juice of one lime overtop and set aside.

Warm a few whole-wheat tortillas.

Garnishes:

Lime Wedges

Chopped cilantro (*which we didn’t have, but wished we did. It would have been the perfect finishing touch)

Place a good amount of Asian slaw onto each tortilla, top with seared tuna slices, mango & creamy sriracha sauce. Fold & eat! 

Curried Cauliflower & Chickpea Stew with Kale

30 Oct

It’s crazy how quickly the seasons change. Every year at the start of fall it feels like the weather turns way too quickly and all of the sudden flip flops get replaced with boots, tank tops with cozy sweaters. I always spend a good few weeks in denial, not wanting to say goodbye to the warmth of summer.

And then somehow you reach a point when it finally feels good to welcome fall and the crispness in the air is familiar and maybe even comforting. I made this stew on one such night a few weeks back. It was the day I succumbed & fully welcomed the changing leaves, the need to grab a scarf in the morning and that feeing that there’s no turning back – winter is on its way.

It was the kind of fall evening where it felt really good to be at home, listening to good music, cooking something hot and satisfying in my kitchen.

I was craving something healthy but rich and this stew did the trick. It’s the kind of meal that warms you from the inside out.

I used a Malaysian curry powder blend that I recently bought at Jean’s Vegetarian Kitchen on Danforth (I’m obsessed with their Malaysian Curry Eggplant) and it had the perfect balance of flavors for this recipe. But you can of course make your own blend pretty easily. I would recommend using a mix of dried spices instead of just straight up curry powder because you need that depth of flavor.

The Malaysian curry blend that I used has a really nice kick to it without being overly spicy. It’s a mix of: coriander, cumin, fennel, pepper, cayenne, turmeric, anise, ginger, garlic, cinnamon, mustard seed, cloves, fenugreek & cardamom.

If you don’t have all of those ingredients, I suggest mixing the more common ones: yellow curry powder, garlic or onion powder, ground fennel and cumin, cayenne, turmeric, cinnamon, powdered mustard.

This is the kind of dish that you can’t really screw up. Adjust to your tastes.

Curried Cauliflower & Chickpea Stew with Kale

1 Medium onion, chopped

1 shallot, chopped

2 carrots, peeled and chopped

1 head cauliflower, chopped into medium sized florets

1 bunch of black kale, chopped

1 can chickpeas, drained

1 can coconut milk (regular or light)

1 tin diced tomatoes (I only had whole ones, so I chopped them myself)

5 tsp curry blend (I used Malaysian curry powder and they were heaping tsp’s)

2 tbsp olive oil

Salt and pepper

Heat olive oil on high, add onions and shallot, sauté until brown (about 8 min).

Add the curry powder and sauté with onions for a minute. Add carrots, cauliflower and chickpeas and mix well. Season with a bit of salt.

Add in tomatoes with a bit of the juice and coconut milk. Add in the chopped kale.

Bring to a boil and then reduce heat to low. Cover and let simmer for 20 minutes to a half hour or more. Season with salt and pepper and serve bubbling hot.

Makes great lunch leftovers. I even ate mine cold for lunch the next day and it was delicious.

Pan-Seared Watermelon with Salmon and Mint Chimichurri

15 Aug


seared watermelon salmon mint chimichurri

Last fall, I picked up a copy of Mark Bittman’s then-new book, The Food Matters Cookbook. I was feeling like my diet needed a bit of a shakeup, and I was drawn to Bittman’s philosophy, which essentially boils down to the idea that meat can and should be used as an ingredient, or a garnish, in a dish rather than as the main event. I love meat and can’t see myself going the vegetarian route, so the ideas and recipes in Bittman’s book struck a chord with me.

Of course, I also have a bad habit of buying cookbooks, flipping through them, and then promptly putting them away in my kitchen and forgetting about them for an extended period. This one suffered such a fate until I pulled it out this weekend for a look and something caught my eye that I’d never tasted, and frankly didn’t even realize was possible—seared watermelon.

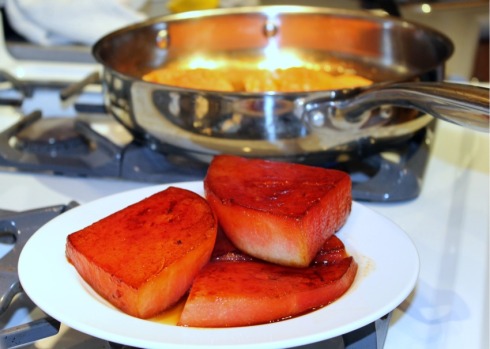
In Mark Bittman’s recipe, the seared watermelon was used as a base for a Japanese-inspired fish dish. He wrote that the watermelon took on a substantial steak-like texture when it was seared, as the water was pulled out of it. I knew I needed to try this, but in my mind, I saw the watermelon paired with salmon (rather than the simple white fish Bittman recommends) and topped with a simple, fresh mint and basil chimichurri, since the flavours of watermelon and mint go so great together.

Jenny and I both agreed that this really turned out amazing. In addition to becoming less watery and firmer when seared, the sugars in the watermelon also caramelize in the pan, which adds a bit of a burnt sugar element. And while this looks like an elaborate, composed dish on the plate, it came together in no time at all—perfect for a weeknight.

pan seared watermelon

Pan-seared watermelon with salmon and mint-basil chimichurri

For the chimichurri:

1 C basil leaves, packed
¼ C mint leaves, packed
¼ C olive oil (good oil, like a Spanish – oil will be part of flavour so it should be good quality)
Zest and juice of half a lemon
A couple grinds of salt and pepper

Place all ingredients and half the olive oil in a food processor. Pulse for a minute or two until leaves get chopped and ingredients are well blended. Add more olive oil as needed, depending on desired consistency (less oil for a thicker chimichurri, more for a thinner one).

For the pan-seared watermelon:

Slice watermelon an inch or two thick and remove the rind. Season slices with a pinch of salt. Heat a metal pan coated with a small amount of olive oil over medium-high heat for several minutes. When oil begins to sizzle, place watermelon slices in pan. Leave to sear for two minutes or so, until it begins to brown, then flip and cook another two minutes on the other side. Remove from heat and set aside on a plate.

For the salmon:

Season individually portioned salmon fillets with salt and pepper. Sear on both sides in a hot pan until cooked, a few minutes per side.

To plate, place a slice of seared watermelon on a plate, top with a salmon fillet, then drizzle chimichurri overtop the salmon.

seared watermelon salmon chimichurri